Imperial Homepage -> Repair -> Air Conditioning -> AutoTemp
Tip from Dick (1967):
I thought some might be interested in some repair work I have just completed on the AC system in my '67 Convertible, with standard (non-ATC) air conditioning. I have the complete dashboard out of the car, and am going through every switch and control device, rebuilding or replacing as necessary to bring the car back to as new operation of everything. I
decided to search for replacement new controls for both the fan 4-speed switch ("Low", "Medium", "High" and "WOW!") and the push button vacuum routing switch that controls the mode of the system ("OFF", "MAX AC", "AC", "HEAT" and "DEF").The reason I decided to replace these controls is that the push button assembly had developed some vacuum seepage, making the response of the air control flaps very sluggish, plus the push buttons were hard to push unless one pulled the previously depressed button out before making another selection. The blower switch had become very touchy on the "WOW" setting - one had to very carefully position the switch lever to make it stay on that setting - it tended to slip off to the "HIGH" setting, hardly a serious problem, but an irritation to the perfectionist (does anyone hear my call?).
I took the switch apart to diagnose the problem, and decided it was caused by warpage of the phenolic substrate in which the terminals are staked. I made the repair, but I didn't feel it was a permanent cure, as the board can just warp further. It is such a royal pain in the posterior to get that switch out of the dash that I decided I wanted to replace it with a new one of better design.
I tried to find these controls on eBay, PartsVoice etc., without success. Then I tried NAPA, - same story. I took the "buyer's guide" from NAPA and began comparing shapes and functions, and found substitutes that others may be interested in making a note of, in case you ever have the need.
For the push button control, Mopar number 2587 564, you can directly substitute a Mopar number 3431 020K, which was used on '69 - up non ATC cars from lesser Mopars, for instance my '69 Newport. The only difference is the presence of an extra electrical terminal on the blower feed lugs on the right rear of the switch. This switch has three terminals, while the original only had two. To use it, just ignore the extra terminal, which is the one toward the center of the control unit. NAPA stocks this control under their number ECH-HC-205. AutoZone also stocks it, but you have to
ask for a 1969 Chrysler Newport switch. As I recall, their number is WF259, but double check that as it is from memory.For the blower speed control, Mopar number 2587 321, you can substitute a Mopar number 4261 306, which was in use at least up to 1980 in the Dodge trucks. The NAPA number for this is ECH-HC-202. You cannot use it directly, you have to change the wire connections to the back of the switch. Directions to do this are as follows:
1. Note the 4 #16 wires to the back of the old switch. They are Brown, Light Green, Dark Green and Tan (on some cars the light green wire looks white, according to my color consultant (I'm color blind, so I take her word for it).
2. Note that the pattern of the connection lugs on the back of the new switch is in the shape of the letter "A", with one terminal at the right bottom of the "A" - this one gets the brown wire. The center bar of the "A" gets the light green wire. The apex of the "A" gets the dark green wire. The left bottom of the "A" gets the tan wire. Clip each of these wires
off the old switch, strip back 1/4 inch of insulation, and crimp on a new spade lug female to each wire. Then solder the crimp so that it won't work loose, overheat, and ruin the new switch. Then, using heat shrink tubing, put an insulating sleeve over each crimp lug, so that they cannot contact each other when installed on the switch, as the terminals are VERY close together. Do all this work with the wires unplugged from the switch, to avoid overheating it.
3. Now, you have to remove the electrical operating doo-dads from the new switch and install them on the old switch, as the handles and mounting bracket are different. Carefully unbend the 3 bent over tabs holding the back of each switch to its housing, and transfer all the contents of the new switch to the old one. You will have to slightly extend the notch for one end tab to make it fit the old switch housing, but you can do this with a nail file (if your wife isn't looking). Be sure to transfer the inner slider and spring assembly also, as they are slightly different and the old one won't work on the new terminal board. Install the new parts in the old housing, carefully bend the holding tabs back down, and Bob's your uncle! Plug in the wires as described above and you have a complete new control system for the AC and Heater/Defroster system. How sweet it is!Question from Demetrios (1968):
Does any of this apply to '68's? Can these substitute switches be used on the '68's?
Replies:
From Dick:
As far as I know, the '68's all have ATC, so the answer would be no. If there are '68's with standard AC, then I think the same parts would likely be used, but I've never seen one with standard AC so I can't be sure.
There is a close equivalent to the ATC type push button unit, the NAPA HC6401, but as I recall, I had to take it apart and modify the electrical portion of it's program. The vacuum hose program was right, though, again as I recall. I used it on my '68, but that was about 15 years ago and I forget the details of what I did.
These are pretty obvious once you get them apart, but you have to melt or grind off the plastic retaining devices, and then drill and tap out the holes for new screws when you get them changed to the program you want. If yours still has all 7 vacuum fittings and the plastic housing is in good shape (meaning no vacuum leaks), you can rebuild it - I've done that a couple of times on other cars. It is painstaking work, requiring good
light, good eyesight, some tiny tools, common sense and a steady hand - I'm sure that anyone who has rebuilt a carburetor can handle this too. You of course need the FSM to tell you which vacuum hose should be active at each push button position. The ATC cars don't have a blower speed switch.From Jim:
1968 Imperials use a different part number push button control switch (2497387). We have these for $64 if you have trouble finding one.
Question from Matt:
Have you or others had experience with Antique Air or any of the other Hemmings vendors? I called them when my fan switch on the '66 wasn't functioning properly and they said they could rebuild. My neighbor fixed it for me so I didn't pursue. Is this an option as well as the new parts you mentioned?
Reply from Dick:
Yes, of course, and I too have rebuilt many switches. The unique problem on the '67's is that the phenolic board to which the electrical contacts is stakes is too thin and flexible, thus the board relaxes over the years in such a way that it will fail again in a while if you simply do the normal burnish and build up with solder repair that most folks do to repair them. The replacement switch that I used is a much better design, and looks to me like it will last forever in this application. I don't know what the situation is with the '66 switch - if the part number is the one I quoted, it will be identical and therefore vulnerable in the same way.
I don't have any knowledge of outside vendors, except parts suppliers and chrome shops, as I do all my own repair work (it's my conceit that I can do it better - or if not better, at least cheaper!).
Tip from Dave (1973):
It gives me great pleasure to announce that there is a solution to the age old problem that is the AutoTemp II servo. New, improved servos are now available!
After reading the rumor on the Imperial Mailing List that Mercedes used the AutoTemp II system, I searched the World Wide Web and found the Mercedes Club of America. Frank Barrett, a technical advisor for the club, kindly and quickly answered my e-mail. He wrote:
"Dave:
Contact George Murphy at Performance Analysis, 1345 Oak Ridge Turnpike, Suite 258, Oak Ridge, TN 37830; 423/482-9175.
George makes and sells replacement servos, including one with an aluminum body that doesn't crack.
Frank"
I called Mr. Murphy, and he was most helpful. He assured me that the Mercedes and Imperial AutoTemp servos were the same. Mercedes used the system from 1976 though 1981. He promised that the $399, all-new, aluminum bodied servo he sold would fit my car. Rashly, I ordered the aluminum servo.
The part arrived today. I installed it. It is a perfect fit, and very imposing looking with its aluminum body. Most importantly of all, it works! With the AutoTemp dialed at 70 degrees, a thermometer in the cabin registered exactly 70 degrees. Plus, there was no sign of leakage.
Although the instructions and descriptions included with the servo are all for the Mercedes, the layout of the two systems is so similar that no Imperial owner will have any trouble installing the new servo. In fact, the literature provides some important statistics on voltages and outputs that the Imperial shop manual assumes only the rarely seen AutoTemp II tester need know.
Mr. Murphy also sells a $299 servo that uses reconditioned mechanics. He also expects your old AutoTemp II servo in return.
After I reassemble my dashboard (was taken apart searching for a short that turned out to be in the servo), I plan to take the Imperial out on the road and really put the servo through its paces.
I feel liberated!
Make sure and check out Dave's website dealing with these pesky critters!!
Tips from Demetrios:
Yes, it's true. Thanks to the helpful advice of many list members, I've just spent the last hour enjoying an icy cold breeze blowing out from the dash vents of my '72 LeBaron. I managed to bypass the ATC servo (that is missing from my car anyway) and make the system work. I intend this to be a temporary fix, only until I can locate a working ATC servo for a reasonable price. Once a suitable ATC servo is located I plan to restore the system to it's original functionality.
For those who have no recollection of my saga, I recently acquired a '72 LeBaron with non-functioning A/C and heat. The ATC servo in the engine compartment is missing, and the heater hoses were connected together resulting in constant heater core flow. NOT a good thing here in Arizona as the temp is rising above 100* this time of year.
The solution:
First, I obtained a manual control heater valve. This is the part common to most full-sized Chrysler products equipped with manually controlled heat (or A/C and heat) from the late '60's through the mid '80's. Cost of this part was under $20 at Checker/Kroger/PartsAmerica.com. The valve allowed me to stop the flow of hot water through the heater core. This alone made an amazing difference in the comfort level inside that car on Phoenix's first 100* day a couple of weeks ago! :^) Next, I purchased a "manual choke control cable" at Wal-Mart. $6 plus tax. I ran the choke cable from the inside of the LeBaron, through the firewall (right next to all the existing vacuum lines that run to the ATC servo when it's there) to the manual control heater valve. Some minor fabrication and a couple of screws and I had myself a nice, workable heater valve. Next January, when the temp falls below 70* for that ten minutes around midnight, I'll be able to reach down and turn on some heat (you know, for the sensitive lady folk...).
Next I sat down with an electrical schematic (kindly provided by Norman) and decided what needed to be hotwired in order to make the compressor clutch engage, and the fan motor blow. Master switch, passenger compartment ambient sensor, compressor switch were all patched. The ambient sensor under the hood appeared in good working order and didn't have to be bypassed (this sensor cuts off the compressor circuit if the temp falls below 32*). At this point I had a functioning system... compressor on, fan blowing on low.
Finally, I had to get more airflow, so I jumpered the fan circuit at the speed controller. Jumpering from "feed" to the "high" terminal produced the results I required. Now I could turn the system on and off using the dashboard push button control. The only remaining problem is to jumper the vacuum lines to control the blend-air, outside air and discharge air servos. Currently my airflow is split among the floor, dash and defroster vents. Comfortable now, but when the heat climbs over 110* or 115* this summer it won't be as comfortable. A few minutes with the vacuum schematic and I should be able to accomplish what I need.
Oh yeah, one last thing... my A/C guy had to remove the ETR valve before recharging the system. Apparently the solenoid was stuck closed. After consulting the electrical schematic I've determined that there is a thermo controlled compressor cutoff switch that works in conjunction with the ETR, so removing the ETR won't have a dramatic impact on the system. Anyone who wishes to offer an opposing viewpoint to this subject, please do so. I always appreciate the advice of more experienced individuals. We also chose to bypass the rear A/C lines rather than replacing the ruptured hose. This had two advantages... first, the system used less Freon to recharge, also, there's 20 or so feet less hose to possibly rupture again in the future. His expert advice and labor cost around $50. $30 for fittings and a new hose. Freon came from a donor car, so there was no cost for that, other than the labor to have it evacuated.
Total project cost is around $120. This would have been much less if my system was holding pressure, but the ruptured rear air line created half the cost. Still, a small price to pay for comfort! :^)
Question from Dennis (1968):
Can anyone tell me if they have tested the vacuum check valves in a 1968 or similar Imperial Auto Temp system?
Reply from Dick:
Look at page 24-57 of your manual, and pay particular attention to Figure 14 and the associated text. I think this will explain how to test the check valves. The 3 armed valve apparently is missing one of the arms shown on the left side of Figure 14, so you can just ignore it for test purposes.
The symptoms of a failed valve are covered in the last paragraph which starts on page 24-56. This refers to Figure 13, which also shows the position and purpose of each of the check valves.
Question from Bob (1968):
I have replumed the atc control unit in the kick panel and still no heat or fan. Does the A/C have to charged for the fan to work. Also in my 68 book there is a brown wire that goes to an ETR valve on the suction port of the compressor but I do not have a terminal to put the wire on.
Do I have the wrong A/C compressor.Reply from Roy:
The AC doesn't need to be charged to have the ATC somewhat working, although you can't fully test it's functionality until you have a source of cold and that also goes for the outside air, you won't be able to tell if the AC functions if the outside air is much colder than forty degrees. As for the ETR valve, the terminal is just a blade for a push-on connector coming out of a thick gasket on the back of the compressor, pointing to the passenger side, I believe. It could be that you have the wrong compressor or it was broken off, either way, your AC should still function if charged. You probably have a vacuum leak somewhere. The hot water valve for the heat also has a vacuum control to prevent you from getting a blast of cold air in the winter before the car is warmed up. Make sure the engine is warmed up and that the valve is allowing vacuum to the fan switch, you might try jumping that connection with a piece of 1/8 inch tubing. Finally when turning on the system, push the High Defrost button first and then the Auto button two seconds later and see what happens.
Successful repair from Bob:
I think I might have solved my problem with the broken vacuum ends on the unit in the passengers side kick panel. I was going to try to glue the plastic fittings back on when I got an idea here is what I did. Instead of doing that I took out the unit and removed the cover. Then I numbered all the hoses and the same ones on the plugs that go on the fitting. Then I removed the hoses out of the rubber grommets that held the hoses. Then I used new vacuum connectors and reattached the vacuum lines. And now I do not have any lines that are unhooked.
Question from Dennis (1968):
Our next problem is: Not getting enough vacuum to pick up the master blower switch in auto or hi-auto mode. The master switch itself is good,
picks up at 8", drops out at 3". About 17" of manifold vacuum is available at pushbuttons.In looking at vacuum diagram (fig. 13) in 1968 service manual, P24-57, I see check valves #2 and #4 connected face to face (i.e., the vacuum "source" side of both valves connected by a straight piece of hose). This can't be right. Fig. 14 shows which valve port the vacuum "source" connects to. There is no way the fig. 13 circuit could work as illustrated. Does anyone know how it is really connected?
Also, does anyone know the routing of the various vacuum ports on the "black box" for varying levels of control vacuum?
Reply from Dick:
When I first acquired my '68 Crown, I went all through the system, replacing the push button control and checking all the hoses and valves, and did not find any errors in the documentation. This doesn't mean there aren't any, just that I didn't notice them. This was 15 years ago, and I no longer recall the details of what I did at that time. I also no longer have the agility or eyesight required to get under there and trace out the whole system again, so I hope mine continues to work as well as it does (it does tend to get too cold in the car when driving into the hot sun, so I have to cover the sun sensor to keep my wife from complaining about it). I'm sorry not to offer more help, but I think you can figure it all out of you keep at it - I did.
Question from Leo (1969):
Has anyone had success in repairing the Auto Temp System in a '69? I have been told that Classic Auto Air in Florida can rebuild the servo systems-any feedback? Any "bypasses" so that one can have air and heat if all else fails?
Replies:
From Tony:
I don't know if the Auto Temp system in the '69 is the same as the '72 but if it is I highly recommend Performance Analysis Corp. in Tennessee. He has what ever you need for it. I recently bought an aluminum servo from him (he only has rebuilt now) and he was very prompt shipping and when I got a part that the post office had damaged he immediately sent me a second at no charge.
From Kerry:
Go to the '73 page and look at my '73 saga. I describe how to bypass the system. New servos are available for about 400 bucks. Go to the repair section under AC
Question:
Does the the ATC for '69-'71 Imps have to have operational air-conditioning before heat will blow from floor, dash, and defrost vents?
Replies:
From Dave:
The 1968 through 1970 AutoTemp is different from the 1971 through 1973 AutoTemp.
In the case of the '71 through '73 version, no, the A/C does not have to be working for the system to produce heat. Just be prepared to have lots and lots of heat!
From John:
I know the compressor always comes on no matter what you select. I'd be curious to know if having the ac not working makes a difference.
Follow-up from Dave:
The most obvious difference in running without the compressor is that the system is unable to control the interior temperature. The heat rises and rises until you think the dash may melt.
Less obvious is the fact the system looses most of its ability to keep the windows clear in cool, rainy weather.
When I was first learning about AutoTemp II with my old 1971 Imperial, I could always tell when the system failed in the winter. My windows would suddenly begin to fog, usually on a dark and rainy night on a secondary road.
Most of the problems I encountered were caused by faults in the servo. Life was much easier when I installed the now famous aluminum servo on my '73 Imperial.
Question from Mark:
By mistake I broke the check valve that is in the black can (7'' long,3'' in diameter) on the inner fender (passenger-side)...this can I believe is tied in with the Auto Temp II which is now not working. The check valve in the can is toast; the valve has 2 connections, one leads to manifold vacuum and the other is a purple hose( real small in diameter) which leads to a vacuum connector for the a/c...how can I be so clumsy!!!!!!
Replies:
From Elijah:
I'm not sure if the original "canister" type of check valve is still available. However, a generic check valve can be had at most auto parts stores. I've got one that's about twice the size of your thumb but performs the same function as the coffee-can sized one.
From John:
Try getting a used one. They were most likely used for several years & probably on other models besides the Imperial.
From Charlie:
If you can find a place that carries pneumatic air fittings they should have a broad selection of low pressure check valves that would work. You would probably have to go with brass instead of plastic. If you happen to know a Honeywell, Johnson Controls or Robert Shaw control fitter, he probably has a few in his junk bag.
From Jim:
You can bypass the check valve by just connecting the two vacuum lines together and it will put some function back in the Auto TempII. The can is a vacuum reserve that holds the various doors and baffles in the ductwork in the proper positions at times when engine vacuum is too low to do it. Without the can & check valve but with vacuum spliced directly into the system, the doors will go to the right positions at idle but will want to go back to their resting state under acceleration due to lower engine vacuum. That means cold air will flow at idle and it will dump to hot air under acceleration. It isn't fun jury-rigging it like that but as a temporary fix until you locate the right can and/or valve, it beats no air at all.
If originality is not a major issue, most American auto makers used this kind of setup during the 70's & 80's. Some (which I won't mention by name) used what looked exactly like a Hi-C fruit punch can with a check valve.
If you absolutely can't find the right one for your Imperial, a workable but non-original substitute from another make ought to be available. You could also buy a can of Hi-C Fruit Punch, bore two holes in it, empty & wash it out and put two fittings in it for use with a generic in-line check valve. I know it sounds sick but it will work.
Follow-up question from Mark:
I have discovered another possible leak...whenever I put the car in park I hear a very faint "whoosh" coming from under the dash, probably around the steering wheel area...is this normal?
Reply from Kerry:
Ah Mark, that's a GOOD clue. Your problem is most likely a vacuum leak on the automatic parking brake release. You should be able to find a vacuum hose that runs THROUGH the firewall. Disconnect it and cap it at the engine. See if that solves your problem. You might be able to easily find it under the dash and plug it temporarily as well. It's up by the parking brake. Capping it at the engine eliminates a cracked hose as well as the release unit. If that solves your problem you can troubleshoot further.
Reply from Damian:
This possibly could be the parking brake auto release.
Reply from John:
That may be the parking brake release. This draws a fairly large amount of vacuum & would cause very ruff running if one of these hoses here disconnected. Up high on the parking brake peddle, should me a canister with one or two hoses on it.
Question from Dave (1968):
My work on the 1968 Imperial Crown convertible has gotten to the point where I am testing the AutoTemp. The AutoTemp has an interesting problem.
I believe that the system was working correctly when I bought the car, and was still working correctly when I first re-started the AutoTemp today.
However, the servo began to make a grinding sound, while I noticed that the system would not start on "Auto" but would start on "Hi-Auto", "Def", and
"Hi-Def". After the system is on, pressing "Auto" turns it off.Pressing "Off" causes a buzzing sound, which I think is the circuit breaker, and cuts the fan abrubtly and leaves the A/C doors open.
I cannot hear the servo trying to park.
My bet is that corrosion has gummed the servo works, causing the motor therein to jam, and thus trip the breaker. Does this sound reasonable to those of you who have worked on this system?
I'd like to open the servo box. Does anyone here have experience with this style servo? I'm curious to know how similar or disimilar it is to AutoTemp II.
Replies:
From Brad:
If the '68 system has anything in common with the '74-'78 system, that symptom is quite common. There is a vacuum switch that is turned on by hot wanter from the engine. On the '74-'78 cars it is located near the blower motor, under the hood, near the firewall, close to the right fender. The device serves two purposes. The device allows the ATC system to turn the hot water on and off as needed and it also houses the vacuum switch that will hold the ATC system off untill the engine reaches about 120 F. When the water is hot, the switch opens and allows the vacuum to be present at the ATC system. There is another switch that turns the electrical on, this switch is operated by the vacuum.
In the DEF position, this system is bypassed and the ATC will run in HI mode at all times to clear the windshield.
Check for vacuum at this switch and at the soup can reservior under the hood. These systems do not employ magic and they can be repaired, often easily with a little investment in troubleshooting.
From John:
I know that the '69 system is fused & not on a breaker, so something else is going on here. Sometime in '73 when I had my first '69, the resistor burned out & the shop wired the system so it would work till they could get another resistor for it. They taped the temp dial in the lowest position & warned my not to touch it. Even with it taped, hitting bumps would often blow the fuse.Even that new, it took quite a while to get the part from Chrysler.
From Pete:
If the 68 Autotemp system is like the 70 (and I think it is) there is no motor inside the servo box.
There's simply a big vacuum servo and it operates sets of contacts. There's also a vacuum modulator to control vacuum level.
I had the box apart on my 70 and took lots of pics. I was trying to find the cause of a continuous "farting noise" (description courtesy of my 12 YO daughter) and checked out the servo box. In my cars case the problem turned out to be the vacuum check valves that are located under the plenum. These fail and the system won't operate properly.
I've been trying to find a source for new valves but don't want to pay $40 for an NOS part that probably has the same problem as my parts. And the parts are non-returnable...
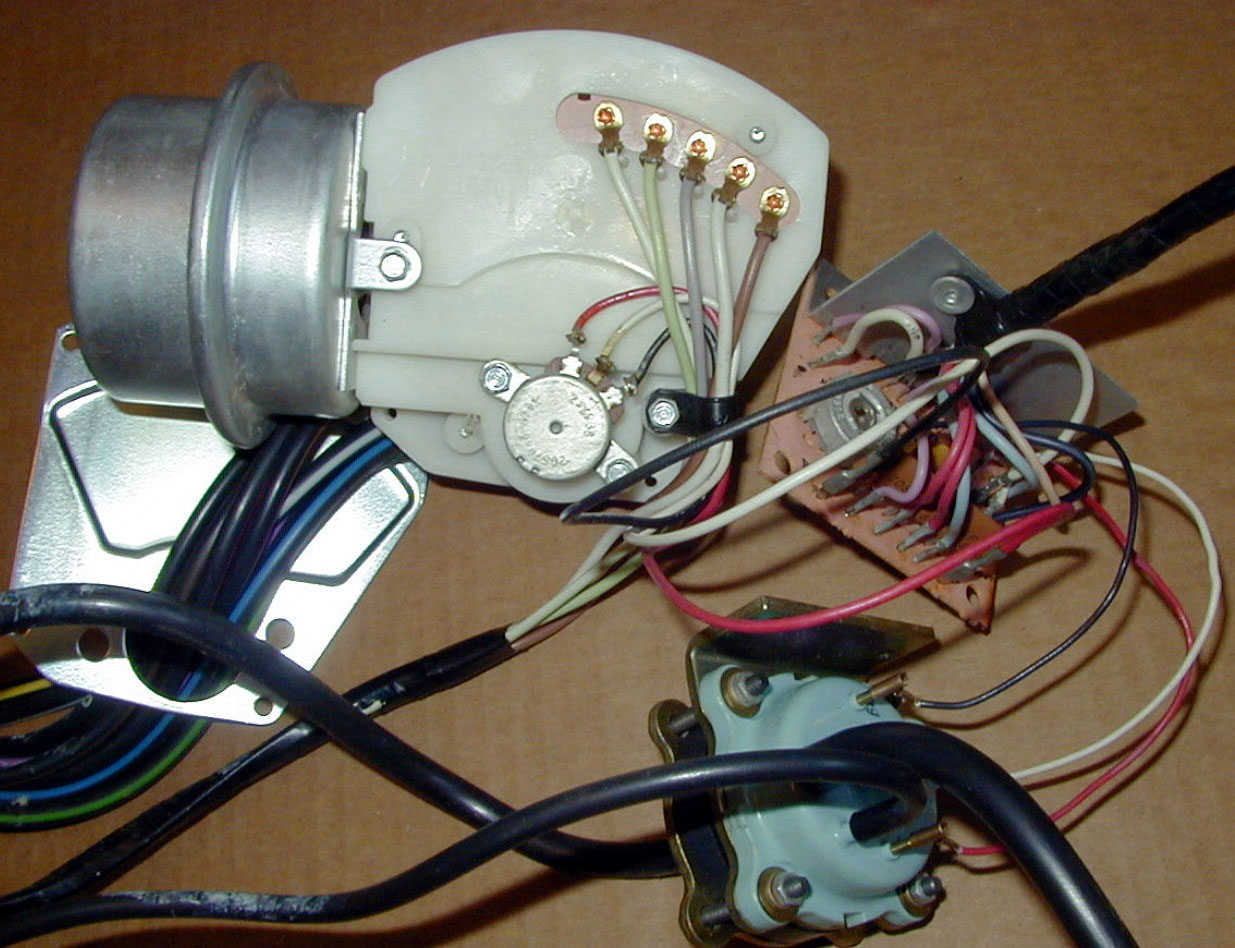
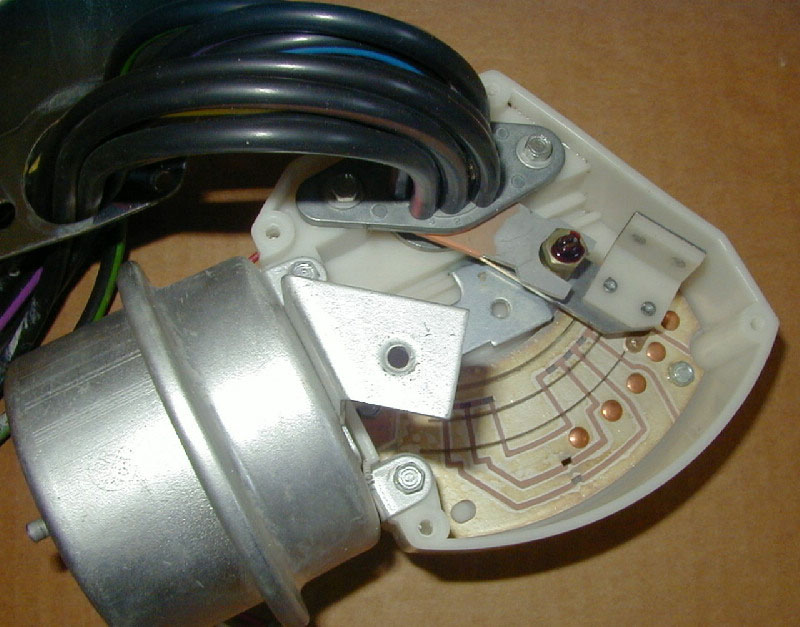
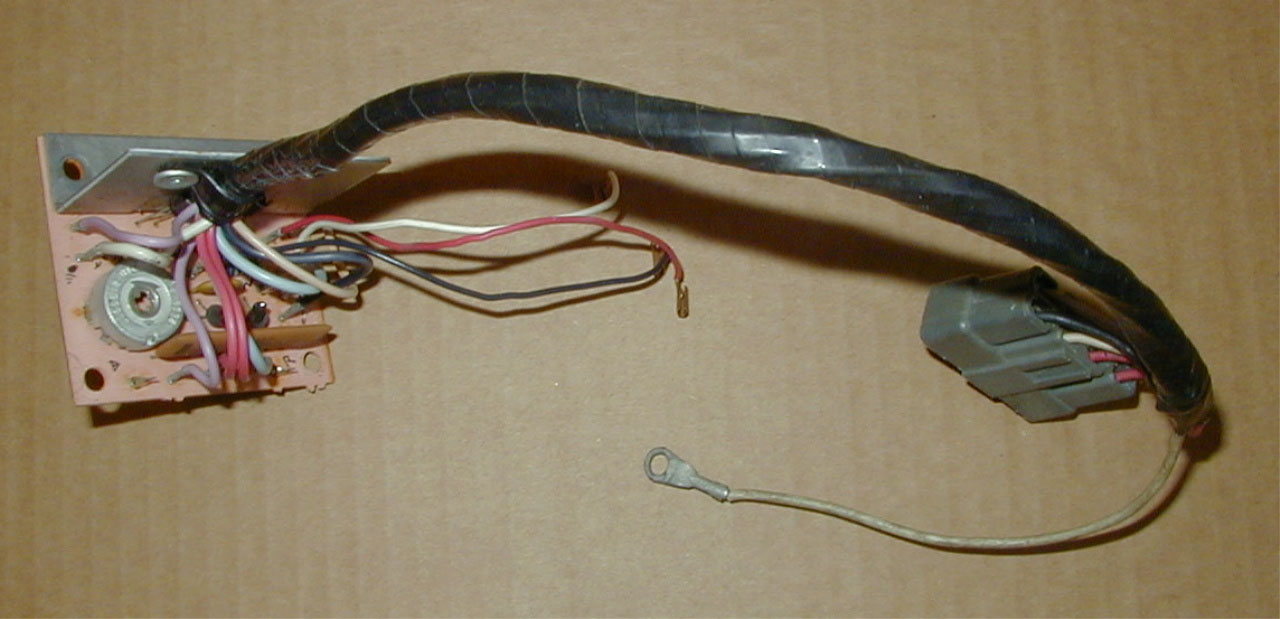
Here's a shot of what's inside the box (300k).
Click on picture to view a larger size.
I tried pretty hard to understand the complexities of the Autotemp system but ran into a roadblock with the amplifier in the brain.
The servo unit is pretty simple -- the vacuum level applied to the servo causes the diaphragm to move back and forth. The diaphragm is connected to the big contact arm and that moves to determine blower speed. Arotary vacuum switch determines air discharge location (floor or vents) according to vacuum level, too. IIRC the one end of the contact strip is for max blower heat, the opposite end is for max blower cooling, and the closer you get to the middle of the strip the slower the blower runs. There's a feedback potentiometer on the contact strip so the amplifier knows where the wiper is.
The amplifier takes a resistance value that comes from a combination of the ambient temp, in-car temp, and desired (dial setting) temps and then controls the transducer.
The transducer then modulates the vacuum level to control the servo.
From what I've seen the system was GM designed and originally appeared in the early '60's on Cadillacs. I think it was called Comfortron on Olds and Chevy cars. Anyway the components sure look the same. I had a '79 Seville and the servo unit looked nearly identical.
Here are some more pictures:
 |
 |
|
Click on any picture to view a larger size.
Question from Chris (1970):
I charged the system (converted to 134-A) in my '70 LeBaron last night; but, I had to run a 'hot' wire to the compressor to get it to run. It has the Auto Temp (not the Auto Temp 2 system...please note) HVAC system. System could use a partial can of refrigerant yet; but w/in opperating pressure.
What I'ld like to know is if there is something commonly malfunctioning on this system to give me a base starting point in diagnosing the problem.
What I have already checked:
1. 20A fuse...power both sides (heater A/C fuse) (used test light)
2. No power to compressor (used test light)
3. No power present at the Low Pressure cut-off switch (used test light)
4 Vacuum lines all hooked upI used a test light to check for power; but, I didn't have my Multimeter to check how much power was present or the resistances of the switches.
I have located the Master Switch and Compressor Switch under the right side of the dash. I didn't test these due to it being midnight, last night.
I have great hopes in working on the A/C tonight. I will have my multimeter and vacuum gage/pump to better diagnos the system.
Out of curiosity...if I jump the Low Pressure Switch, Compressor Switch, and Master Switch will the A/C compressor run/engage regardless???
Reply from Roy:
If you jump just the compressor switch the compressor should engage. If it does, check the switch with a vacuum source, sucking on a short piece of hose will do. Once you isolate that, you can move on to other tests. If the fan doesn't come on when you push the "Auto" button, try pushing the "High Def" button first and then the "Auto" button, that is a common problem when the little vacuum check valves get old and dried out.
Question from Tony (1971):
Well I finally had time to try and get my servo working.When I got it off I found a big crack in the main body.I decided to go with the idea of bypassing the servo with the water hoses.I connected the 2 hoses from the motor to the 2 hoses from the firewall.In one of the hoses I put a open/close valve.Everything is good(no leaks) but when I open the valve to allow water to heater I cant get the heater blower to start.Any ideas what I may have done wrong or is that normal.
Replies:
From Kerry:
When you disconnected the servo, you disconnected the fan controls as well. The previous owner of my 73 did the same thing. His solution was to put a small toggle switch on the dash that turned the fan on. If you pull the ductwork below the glove box, you will find the resistor pack that determines fan speed. The shop manual shows which wires and terminals do what but, as Elijah pointed out to me, be sure to look at the NON autotemp schematic. You are going to have to run some wires. The best solution is to get a non autotemp dash control for temp and fan and completly de-install the autotemp system.
From Elijah:
On the very bottom of the Power Servo Unit is a small aluminum piece with two vacuum hose connections. This little guy is a coolant temperature sensor. Its sole purpose in life is to prevent the heater fan from "blasting" the occupants of the car with cold air before the car has warmed up.
So your problem is that this sensor is not "sensing" any hot water in the hose, and thus does not allow the fan to come on when "Heat" is pushed on the dashboard controls.
I'm 99% sure that if you simply connect these two vacuum hoses together, you'll solve the problem. The fan switch is actually vacuum controlled, so when "Heat" is pushed, this sensor blocks vacuum to the fan switch until the coolant is hot enough.
You can find vacuum connectors in various sizes at most auto parts stores. Look for a rack of bright red packages under the "HELP" brand.
From Gary:
I too have a 1972 LeBaron and it also had a cracked servo. I found a place called Performance Analysis Co. who remanufactured the body to aluminum for the Mercedes Benz cars, they used the servos for more years than Chrysler.They are not cheap but they work great. You can reach them at (865) 482-9175 or fax (865) 482-9175. They are out of Oak Ridge TN. 37830. I sure hope you go with a new servo instead of tearing apart your dash kind of ruins the integrity of the car, just my opinion.
Question from Robert (1972):
I have decided to tackle the non-functioning a/c system in my '72. As you all likely know, this is an Auto Temp II system. Anyway, the symptoms are: nothing happens when any of the buttons are pressed. I have gone through the shop manual and tried a few things. What I have determined so far is the little diaphram things on the air box do move when the buttons are pressed, however the fan does not come on, and I am not sure if the A/C compressor is functioning or not. There is no noises or any signs of activity I can determine anywhere in the system.
Anyway, the one thing that has me scratching my head is this. Checking the vacuum line connector at the buttons, as I thought I heard a vacuum leak (was something else not related to the a/c), there is a seven line coupling, the shop manual shows number 5 is a "bleed wire". On my car, this vacuum line has a grey coloured piece of electrical wire stuck into the line, and the other end was not connected to anything. It ran towards the passenger side of the car, but I could not find where this wire may have went. Now, for the life of me, I cannot figure out what an electrical wire is doing stuck in a vacuum line hose, however the labeling as a bleed wire tells me this is supposed to do something, and the wire is in there quite tight, so maybe it belongs there? So, can anyone familiar with this vintage vehicle straighten me out on this "bleed wire" thing, and point me in the right direction on trouble shooting my a/c system. I am seriously considering stripping off a non autotemp system from a similar vintage Chrysler and converting, but thought I would take a shot at fixing this one first.
I am aware that the main problem with these systems is that big plastic box on the passenger side fender liner, but how do I find out if this is good or not? I couldn't find any screws, and the top seems to be attached by some pliable rubber or silicon plugs, so I am leery of pulling it apart, at least until I have secured a few spares to swap on.Reply from Dave:
The compressor and fan are controlled by two vacuum switches located under the dashboard on the passenger side. The compressor switch is yellow. The fan switch is green. Both have color coordinated vacuum lines and electrical connections that must be firmly in place.
If the vacuum in the system is too low, neither switch can work. Low vacuum can have a variety of causes, but the most common are disconnected, pinched, or cracked vacuum lines.
If the vacuum is good, the switches can be heard to "click" when Hi-Def is pressed.
It is easy to see if the compressor is turning on. Just turn on the car then hit Hi-Def and look under the hood to see if the A/C compressor clutch is turning. If not, the problem could be low vacuum to the compressor switch, low pressure in the A/C system, a disconnect in the wire to the A/C clutch, or even a blown fuse.
"Anyway, the one thing that has me scratching my head is this. Checking the vacuum line connector at the buttons, as I thought I heard a vacuum leak (was something else not related to the a/c), there is a seven line coupling, the shop manual shows number 5 is a "bleed wire". On my car, this vacuum line has a grey coloured piece of electrical wire stuck into the line, and the other end was not connected to anything. It ran towards the passenger side of the car, but I could not find where this wire may have went. Now, for the life of me, I cannot figure out what an electrical wire is doing stuck in a vacuum line hose, however the labeling as a bleed wire tells me this is supposed to do something, and the wire is in there quite tight, so maybe it belongs there?"
The bleed wire belongs there and connects to nothing. It seems to be a kind of plug.
"I am aware that the main problem with these systems is that big plastic box on the passenger side fender liner, but how do I find out if this is good or not?"Examine the lower half of the servo for cracks and signs of leakage. When you turn on the AutoTemp, listen for the motor inside the servo; you should hear it whir smoothly.
The servo controls fan speed and temperature. When it sticks, the system will turn on, but be locked on one temperature and one fan speed. Sometimes the servo can be heard to labor, and the electrical drain is noticable in the alternator gauge.
Since your car isn't running the fan or compressor, your problem is probably not the servo.
"I couldn't find any screws, and the top seems to be attached by some pliable rubber or silicon plugs, so I am leery of pulling it apart, at least until I have secured a few spares to swap on."
Underneath those dabs of sealer are four screws that hold on the servo lid.
Question from Bob (1972):
I pulled apart my Autotemp II servo unit, mostly to see if I could figure out how it is supposed to work, and now I have some further questions.
First off, I checked the master and fan switches on the heater box on the car. I found that the fan switch was bad and wouldn't hold vacuum, so it wouldn't turn on. The master switch seemed to be ok. Anyways, I jumpered both switches with short pieces of wire, so now they are permanently "on" and I have a functional fan.
Just today I took apart the servo unit, and found that there was signs of fluid in the part of the casing where the big motor thing is, the other three quarters of the casing were clean. After starting the car, I watched the servo as the car warmed up, to see if I could see any signs of it functioning. I didn't hear any noises, and when I pulled the case apart again, with the engine still running and at operating temperature, I noticed that the motor on the bottom of the unit would turn very slowly, and only if I helped it. The system appeared to be stuck on high heat, no amount of changing the temperature knob would change the temp, nor would changing from low to high a/c or how or high defrost, and there was no sign of the A/C compressor clutch working. I also noticed a slight amount of coolant inside the casing, again in the part where the motor goes, although I could not see where it was coming in, and it remained only a small amount on the bottom of the housing.
My questions are, how do I test this motor in the servo to see if is in fact, actually working, and are replacement motors available and at a reasonable cost. Also I couldn't figure out the purpose of the smaller motor mounted in the top part of the server, it never seemed to do anything while I played with the system, and I couldn't determine it's purpose. And finally, how do I know if the a/c compressor clutch is engaged, I am assuming the outer part of the pulley should be spinning with the pulley? This was not turning when I checked it, no matter what setting I put the a/c controls at, including off. I am assuming this means the clutch has failed, or the compressor is not getting a signal to engage the clutch? Strangely, I seem to remember the last time I played with the system, the outer part of the clutch was spinning.
Anyway, I am hoping I can get some answers or suggestions from the gurus here, otherwise I will have to spend actual money at an a/c specialist in town, although I don't want to spend money getting the refrigerant flushed and changed over until I know the system is functional. And I am not to keen on paying their hourly charge for them to troubleshoot things, although I am beginning to suspect that this system is beyond my ability to troubleshoot. I may be able to swap on a borrowed unit from another car, known to be functional, so I can at least determine, hopefully, if the a/c compressor is funtional.Replies:
From Kenyon:
You are a brave man, or one desperately seeking air conditioning. I have avoided the AutoTemp II unit on my car, so can't answer all of those questions, but regarding the AC pump:
There is a wire lead that goes to it on most cars that I have seen comes up along the passenger side of the intake manifold. Could be different on the 73, but check for the wire that goes into the AC unit. If it is disconnected or something silly, that could be it.
The pulley that is on the front of the AC unit spins around the crankshaft of a miniature 2-cylinder compressor in a freewheeling motion when the unit is inactive and the car engine is on. Applying current to the connection where the wire goes in activates the clutch mechanism, which allows the spinning pulley to grab and spin the crankshaft, and the thing starts working.
I have seen many AC units that have failed. They are miniature V-twin engines with pistons and rings and they need oil to operate. It is possible to have them sieze. I have had 4 cars where they had seized and if you physically grabbed the end of the clutch (car engine off, please), that you could rotate the AC crankshaft around a 300 degree rotation before the con-rod, now seperated from the siezed piston would lodge somewhere that prevented further rotation. Verify that your AC unit is actually a viable pump and not a defunct assembly of parts if you have not done so already.
You said that it ran before, so I'd be positive. Good thing might be to check the oil on that pump? There is a plug that you can remove to do this (See the service manual). I check the oil first when I get a car and try hard to avoid pushing the AC selector before doing so, as the one time that I did the pump siezed on the freeway and burned up the belts before I figured out that the horrible smell of burnt belt was in fact coming from my gorgeous car as I crossed the SF Bay Bridge with fellow motorists making faces and gestures at me.From Paul:
if the A/C clutch is engaged, the part you see will turn when the engine is running. When the clutch disengages, that part will stop turning. There can be two reasons for it not to turn. One is that the circuit is open. Look for a disconnected wire or bad connection. The other is if there isn't sufficient freon in the system. I think your car may be too early to have the pressure switch. If it has a pressure switch, it is also possible for that switch to fail, and not allow the clutch to engage.
This brings up a good point, that being that if your compressor is seized, it will not turn when the clutch is engaged. However, a seized compressor will also create more commotion than simply not turning when the clutch is engaged. The belt will most likely slip on the compressor pulley. There will be a lot of "belt scream" and probably smoke from the burning belt. As explained, since you had mentioned that you had seen the compressor operate previously, this is probably not your problem.
If you are able to get everything operating, it would be a very good idea to have the A/C system serviced by a qualified technician. The insufficient oil condition described in Kenyon's post can/will lead to compressor failure even if it seems to be working fine and blows cold air.
From Dave:
I took an old AutoTemp II servo out of storage and photographed its construction from top to bottom.
You can see the electrical circuit, the vacuum circuit, the sweep arm, the motor, the transmission, the flawed valve chamber, and even the lockout switch.
I have added some information and pictures to my website which may help answer your questions:http://www.duricy.com/gallery/view_album.php?set_albumName=The-AutoTemp-II-Servo
Here are some answers to your specific questions:
After starting the car, I watched the servo as the car warmed up, to see if I could see any signs of it functioning.I believe that if you put the igntion in the "On" position, the servo will be activated. Without the noise of the engine, you'll better hear servo movement.
I didn't hear any noises, and when I pulled the case apart again, with the engine still running and at operating temperature, I noticed that the motor on the bottom of the unit would turn very slowly, and only if I helped it. The system appeared to be stuck on high heat, no amount of changing the temperature knob would change the temp, nor would changing from low to high a/c or how or high defrost, and there was no sign of the A/C compressor clutch working. I also noticed a slight amount of coolant inside the casing, again in the part where the motor goes, although I could not see where it was coming in, and it remained only a small amount on the bottom of the housing.
These are classic symptoms of a compromised servo. The plastic has failed, liquid has entered the servo body, the motor is frozen, the gears are rusted together, the sweep arm is stuck to the circuit board, etc.
When the servo is stuck, it is stoped at the fan speed, door position, and temperature level where it was when it died.
My questions are, how do I test this motor in the servo to see if is in fact, actually working, and are replacement motors available and at a reasonable cost.
You can hook up the servo (off the car) to a 12 volt transformer. If a replacement motor is available, you'll have to find the match yourself.
And when you do, your new motor will be just as doomed by the plastic body.
Also I couldn't figure out the purpose of the smaller motor mounted in the top part of the server, it never seemed to do anything while I played with the system, and I couldn't determine it's purpose.
That's not a motor. It is somekind of switch. It can only turn when the real motor tells it too. If the real motor is frozen, well. . .
And finally, how do I know if the a/c compressor clutch is engaged, I am assuming the outer part of the pulley should be spinning with the pulley?
You can tell when the compressor is engage when the center portion spins.
However, the compressor will only operate if there is enough refrigerant in the system.
You can still see if current is getting to the clutch by using a test light. I recently did this with my '68 Crown, which uses a different AutoTemp system but the same A/C clutch.
Anyway, I am hoping I can get some answers or suggestions from the gurus here, otherwise I will have to spend actual money at an a/c specialist in town, although I don't want to spend money getting the refrigerant flushed and changed over until I know the system is functional.
Unless your A/C expert is an exceptional fellow who once worked for a Chrysler dealer, you're likely to be disappointed. As has happened to me, you'll probably end up with a fat bill, a damaged car, and no air-conditioning.
For me, the money was better spent on an aluminum servo, tools, and education.
Follow-up question from Bob:
I noticed that the "high water mark" on the motor housing was only about 1/3 of the way up the outer housing, which appears to be a one piece shell, so is it possible that the motor didn't get contaminated with antifreeze? It is probably a moot point, as I suspect the motor has failed, however I am going to do the twelve volt thing you mentioned, and thanks for the ignition on, engine off trick, I forgot to try that out. And from your post, I guess it is a good sign that the sweep arm and circuit board appear ok, it looks like coolant never got that high inside the servo. So assuming I can get the motor running, the next step looks to be take the car to the a/c garage and have them do the conversion, and have them tell me that every other component in the system needs replacing/rebuilding :-). Note that I share your scepticism regarding the a/c troubleshooting, which is why I am trying to do as much of the grunt work myself.
Reply from Dave:
The problem isn't so much that the servo fills with water, flooding compartment after compartment - although the driver DOES get that sinking feeling.
Like fog on a bathroom mirror, condensation forms on the gears, wires, and vacuum ports in the upper areas. That's all it seems to take.
One other problem a servo can encounter that I forgot to mention is the valve itself. If a servo hasn't been used in a long time, the valve can stick to the sides of the housing. It seems to me that I actually had the end of the valve come off, once. Of course, that let all the water through, which turns your interior into an oven.
Question from Robin (1972):
Ongoing saga of auto temp II in a '72 Imperial. It worked fine when I bought it about a year ago. But then the body cracked. Found another on a Mercedes at the junkyard. Could not believe it. So slapped that one on. Well it did not leak and since it was winter warm air was fine. I then disassembled the original and discovered it is not that complicated at all. The inners of the original were in like new condition. Then I pulled the one from the Mercedes apart as it would not give me any cold air. Well the insides of this one were a complete disaster. Corrosion everywhere. Got moisture inside it somewhere along the way. OK. Swap innards from original over to the Mercedes body. Great. Now it makes cold air but will not blow except for a short blast after I switch it from Hi Def. Also when the switch is selected to Lo auto or Hi Auto there is a definite vacuum hiss coming from the selector unit. I had this out also but not much you can do with it. Anyone have a spare or know of a junker that could donate one? I think that might be my problem. Any other ideas? I know a new aluminum servo would be nice but money is tight right now.
Reply from Kenyon:
I was where you are now. I bought a second unit from a vendor that came out of the shipping box already cracked. They all seem to either crack on the bottom and leak out, or crack on the top and leak into the mechanicals and destroy the mechanicals. This all appears to be a matter of eventuality, so I'd suggest not investing any hope in your units that you can't afford to give up on later.
Kerry put in a manual system as seen in his '73 saga, and I'd suggest doing either that or getting the aluminum one.
Question from Robin (1972):
I replaced the servo on my '72 Imperial the other day and had to swap out the bottom piece that the hoses connect to.It is held onto the servo with 4 screws and is easy to change but the problem is the seal. It is a rubber seal that is not doing a very good job anymore. Anyone know where a person could obtain one of these?
Reply from Mark:
About 10 years ago, I had this same problem with my '72 Coupe. At that time, NAPA sold a manual heater control valve in which the bottom section looked just the servo controlled Auto Temp II, but the top half had none of the controls or the servo motor. I DID, however, have that seal, all new and pliable, in there. By dissassembling the new NAPA unit, I was able to reseal my old Auto Temp II unit.
Try to get the folks at NAPA to allow you to look through the pictures of their heater control valves. You'll see one that has the same bottom end asthe Auto Temp II unit, (if they still have it).
Question from Ron (1972):
Would anyone know where new (or reconditioned) servo modules can be purchased? The unit on my '72 is dead. Are there any later electronic options that could be retrofitted at a reasonable cost?
Reply from Elijah:
New Power Servo units are indeed available, and in an aluminum body, which will last much longer than the original plastic.
However, they ain't cheap. ;o)
And, as a side note, the same Power Servo unit was used on several years of Mercedes automobiles, which explains the expense associated with them.
Question from Nils (1973):
On my '73, the AC is empty and needs to be charged. But isn't the blower/fan supposed to work anyway? I can select Hi and Lo and Defrost and will feel heat coming out the vents, but it is only forced through it by the headwind during driving. I don't need the AC right now, but I could use the blower to defog the windows now. Any ideas? Or is it normal that the blower won't work without AC?
Replies:
From Brad:
No, it is not normal. The blower should work regardless of the refrigerant charge in the AC system. I would start by checking all the fuses in the car, then disconnect the power wire to the blower and apply power from the battery to it to satisfy yourself that the blower at least can work. After that you need to troubleshoot Auto Temp. This is not as hard as some think. There are a few components that are prone to failure and need to be checked. Next, I would check the vacuum source under the hood. That black soup can is for the ATC. You need to have good engine vacuum at that cam and the hoses need to be on the correct way, they are not universal as there is a check valve in the top of that can. (I can't remember which way is correct at the moment) I am mostly familiar with the ATC on the 74-78 cars which differs from yours so I can't be much more help on your particular system.
From Dave:
The AutoTemp II blower can run without refrigerant in the A/C system.
The service manual, which you really must own if you intend to have a long-term relationship with a 1973 Imperial, makes the following suggestions for a blower that fails to operate in any mode:
(a) Blower motor wiring disconnected
(b) Defective blower motor
(c) A/C-heater fuse blown
(d) Vacuum operated master on-off switch defective
(e) Leak in vacuum circuit
(f) Resistor block burned out
(g) Pinched vacuum line to master switch
(h) Blower motor not grounded
As others here have already suggested, check your vacuum lines for leaks. Look particularly at the green and yellow fan and compressor switches located under the dashboard on the passenger side. Each should have a vacuum line firmly in place. Each should have an electrical connection firmly in place.
You can always tell your master fan switch isn't activating when you don't hear a small "click!" when activating the AutoTemp with the engine at operating temperature.
If none of the above cure your problem, cast your suspicions on the AutoTemp II servo under the hood. Chances are that the unit is seized by corrosion and warped by deteriorating plastic. A replacement unit made of aluminum by Performance Analysis Company, 1345 Oak Ridge Turnpike, Oak Ridge Tennessee 37830. Phone is (865) 482-9175.
It has been my experience that most AutoTemp troubles are caused by the plastic servo. My AutoTemp system has been trouble-free for ten (10) years thanks to the aluminum servo.
From Paul:
Don't they have an engine temperature switch that turns the blower on after the engine reaches a specific range? If it does, that might be an easy thing to check.
Follow-up question from Peter:
Where is this switch located?
Reply from Elijah:
The cold engine lockout switch is located on the very bottom of the AutoTemp II servo unit (the big black box on the passenger side fender-well with all the vacuum hoses and electrical connections). It has two vacuum hoses going to it.
A quick and simple test is to connect the two vacuum hoses. If your fan then works, there's the problem.
Reply from Dave:
The cold engine lockout switch is located directly beneath the AutoTemp II servo.
Reply from Paul:
If it has one, it would be screwed into the engine block or one of the cylinder heads. There would be a wire going to it from the blower wiring. Some automatic temperature control systems incorporate this switch to keep the blower from blowing cold air on the passengers until the engine is warm enough to generate heat.
I am in the process of purchasing a '68 with Auto Temp, but I haven't got it home yet so I am not very familiar with that system. I think the one in the '68 is different than the one in your '73. My folks bought a '68 LeBaron new with Auto Temp, and I believe that it did have this type of switch in the system.
There are some systems where engine coolant actually ran through a part of the system. I am thinking that the second generation Auto-Temp (as would be on your car)incorporated this unit. I have seen a couple of posts in response to your problem, one from David Drucey which describes a metal replacement unit that I believe is this part.
Question from Jack (1973):
OK, I've been through the FSM on this one, but am hoping for some experience from the 'field'. I replaced the servo a couple of months ago with a rebuilt unit from the Performance a/c guys in TN. Everything was fine until recently....
First, the temp lockout quit working (would blow cold air on a cold morning) but all else worked. Then, it just blows hot, no matter the temp setting. It does send the air to the floor or the windshield, depending on the button pushed, and the fan speed seems to respond to either the normal or 'high' selection. But, heat only, even when it's not needed. Any ideas?
Replies:
From Dave:
Since the cold-engine lock-out feature is not working, look first under the AutoTemp servo. The vacuum lines to the lock-out switch may have come loose. One line should have a white stripe, the other should have a yellow stripe.
Check the other vacuum and electrical connections in the area for secure fit.
If your AutoTemp is still not working and the servo is still under warranty, send it back to Performance. I suspect what has happened is that either the water valve plunger has come loose and is jamming the works, or the electrical contact at the end of the sweep arm has come loose and is jamming the works.
From Brad:
The 73 system is somewhat different than the 74-78 system but on the latter, the temp lockout switch is an integral part of the hot water shut off valve. If the 73 unit is anything like the latter unit in this respect, I would not be surprised to see these two symptoms appear as you have described. I would first turn my attention to this valve and see if all is well there. If the 73 ATC is way different than the 74-78 unit, then I would be way off base.
Follow-up question from Rich:
My '73 heater works like yours. No matter what the temperature is set on you always get heat. My AC doesn't blow any cold air, and like yours it's the servo unit which I was told you can't get anymore. I see you had yours rebuilt. Could you send me their phone number.
Reply from Jack:
here's the place that sells autotemp servos remanufactured with aluminium bodies.
Performance Analysis Company
1345 Oak Ridge Turnpike
PMB 258
Oak Ridge, TN
37830
865-482-9175
It looks like a well done piece, and their service is great so far. I'm surprised that it might be defective, but that's been my luck with everything I've done to the car this fall.
Question from Zack (1974):
The Auto Temp II in my '74 Imperial works great, but somewhere under the passenger compartment, there is a buzzing when the heat, or air is on at some middle temperature. (not at 85 and 65 degrees.) It happens once the cabin has reached the desired temperature, and then it starts buzzing. Could it be a servo that is not quite sealing all the way? Any help on what the problem is, and how to fix it would be great! And, if it is the servo, can I repair it, or do I have to buy a new one?
Replies:
From Elijah:
The buzzing may well be a leaf or other piece of "stuff" in the fan housing.
If your system cuts off under acceleration, there is either a vacuum leak (which can be anywhere in the car's vacuum system) or a bad check valve. The shop manual provides good instructions for testing the check valves for leaks.
From Brad:
Your problem is that the check valve in the vacuum reservoir is toast. These are dead simple to replace and easy to come by. You just replace the soup can under the hood.
Question from Mark (1974):
When I depress the LO or HI-Defrost button on my '74 Imp to get the fan working for a few seconds and then I depress the LO-HI- Auto button and I hear the blend door close (or is it opening?) and then the A/C works normally.
Otherwise. if I just depress the AUTO button the a/c will come on but with no fan, and if I lift the hood I see ice on the expansion valve. Is this weird or what?
Replies:
From Joe:
Under your dash on top of the air conditioning control box there is two vacuum switches. They are I believe yellow and green. When they go bad they can drive you crazy. Keep it in mind as they control the doors and are vacuum and electrical operated.
From Steven:
See if you are getting vacuum to the green vacuum fan switch under the Auto Temp unit. You can recognize it by the vacuum line and the two green wires going to it.
From Brad:
This is my understanding of how the system works.
In the Auto positions, the system will not start until the engine coolant reaches about 120F. There is a temp sensor built into the water control valve that is located in the heater hose under the hood, near the firewall and the right side of the car. There are three vacuum lines going to this valve. You can see a picture of it here. http://www.newyorkeronline.org/m-r/HVAC/AutoTempDemoModel/image9.htm
This temperature activated vacuum switch turns on the master switch that is located on the top of the air box under the dash. http://www.newyorkeronline.org/m-r/HVAC/AutoTempDemoModel/image6.htm
It is the turquoise one on the left in the picture. If I were to troubleshoot this issue, I would start by bypassing the vacuum switch under the hood to see if it is faulty. I understand these are available new. Then, check the master switch under the dash pad.
In the DEF mode, the system ignores the temperature sensor under the hood and turns the fan on immediately. That is why I suspect this system to be at fault.
Question from Roger (1974):
Just checking to see if any of you guys have had this problem blower motor will only run in defrost mode...any ideas??
Reply from Brad:
You're in luck. I just discovered something that will cause that. Read the last section of my ACT repair on my 76. You can test your little valve by just pulling up on it to see if that makes a difference.
http://roadhoggtech.dns2go.com/nybml/membercars/bradhogg/76NYB/atc.htm
Question from Roger (1974):
My 1974 Imperial blower runs on high or low defroster but will not run on heater .... any suggestions and have any of you 74/75 owners ever gotten the metal cover off that's between the dash pad and windshield?
Replies:
From Steve:
That "cover" pops up. It is held on by clips. Just make sure it doesn't hit the windshield when you pop it up.
The fan-motor/blower operates only on Defrost? Was this the car that you recently replaced the Water Valve on?? There are 2 vacuum connections on it for the Cold Engine Lockout Switch feature. The only way the blower should operate in Lo-Auto or Hi-Auto (not Defrost) is if the 2 vacuum connections are connected properly and with proper vacuum. The Cold Engine L-O Switch on the Water Valve lets the fan turn on when the temp of the coolant rushing thru the valve is above 125'F. My AutoTemp II kicks on when the coolant reaches 140'F....unless I have it set on Defrost, that is.
From Brad:
I've noticed this difference. When on Defrost, does the system ignore that cold engine lockout switch?
Reply from Allan:
Yes, when on defrost the ATC ignores the lockout switch. If the switch is bad, you can just jump it and the blower will just come on all the time. Sometimes it is just bad or reversed vacuum connections or just corroded wires.
Reply from Dick:
Yes.
This function is described in your owner's manual. The purpose is to prevent blasting you with icy air when the engine has not yet warmed up. The reason for the override function on Defrost is to get the glass above freezing at the earliest possible instant, regardless of passenger (dis)comfort.
Question from Mark (1971):
I haven't driven my '71 coupe much lately, but I was thinking of taking it on the road for Christmas, and so today I checked to see if my heater was working. I have AutoTemp II.
Well, regardless of the setting - "AC, MAX AC, DEF, MAX DEF" - I just get cool air. Not really cold, just moderately cool. The temp wheel has no effect. My question is, is this a bad temp. sensor? Is the problem in the AutoTemp unit, or somewhere else
Replies:
From Dave:
It is rare for the temperature sensors to fail. It is more likely that your AutoTemp servo has quit.
Since your car has not been driven in awhile, it is likely that the servo valve has become dry and sticky. When the valve sticks, or the servo motor is jammed by some other means, the position of the water valve and everything else inside the servo becomes locked. The valve can't open or close to control the amount of hot water going into the car, and the vacuum gate and electrical switches can't move to control airflow.
A few casual observations can indicate if the servo is stuck: 1) When any AutoTemp button is pushed, the alternator indicator plunges towards discharge. 2) No sound can be heard from the servo itself - when the system is turned off, you should be able to hear the servo "park." 3) The interior temperature never changes under any condition, and the fan speed never changes automatically. Fan speed can still be influenced by the "Hi" and "Lo" settings.
If you are very fortunate, the servo will free itself. In the past, I would bring the engine to operating temperature then turn "Hi-Def" off and on a few times.
However, if the stoppage is due any servo failure other than a sticky valve, all hope of a quick fix is lost.
The servo can be taken apart, and depending on the location of the failure, the difficulty of repair varies. If the plastic body of the servo has cracked, forget it. Of course, study the AutoTemp diagrams in the repair manual first, and if you plan to drive this car at all, consider getting the aluminum bodied AutoTemp servo. It's a life savior.
From Dick:
Feel the heater hoses where they connect to the water valve. If the water valve operating lever is accessible, just disconnect the control cable or hose (depending on what type of valve you have) and operate the lever by hand. You should be able to feel the water temperature change when you open the valve if it is stuck closed (which I suspect). If this makes the heater pump out heat, then investigate whether or not you are getting control vacuum or mechanical motion out of the actuating system, and troubleshoot from there. MAX DEF position bypasses most of the control system and turns on maximum heat, at least in the earlier ATC systems, so this should surely give you strong vacuum at the control hose, if the valve is vacuum operated.
From Barry:
Have a mechanic check the water control valve. It's under the hood with heater hose running into and out of the inline (wcv). I believe it has an off/on cable coming from the heat/ac controls. The heater hose should be warm on the outlet side going into the firewall via the heater core.
From Steve:
The 1st thing I would do is check my antifreeze level. Then, check to see if both heater hoses are getting hot. Check them at different places along the hoses.
Start with the simplest and often overlooked things first...before tearing things apart.
Question from Andrei (1974):
I'm going to buy the A/C compressor and clutch. Unfortunately there are no parts for 1974 Imperial. I was offered for New-Yorker the same year and 440 engine. Can someone check if it's interchangeable?
Replies:
From Ray:
Bah, what fool told you that? Those compressors are the same for just about every Mopar made during that era. I just looked up '74 Imperial 440 A/C and came up with a compressor and a clutch kit for $219 (US).
TEM272209 was the item number.
From Matt:
The New Yorker compressor & clutch are the same as the Imperial and interchange. I don't know about the R134a compatibility- Canadian Tire doesn't list the Imperial in their computer because of their low production numbers...For the things available at Canadian Tire just say you have a New Yorker and they'll work.
From Steve:
The compressor would fit the Imperial as well as the New Yorker. Almost all rebuilt compressors sold today have seals that are compatible with R12 or R134A. There should be a label in the box telling you which refrigerants the compressor is compatible with. You also must change the dryer to a model that is compatible with 134a and flush the system / change the oil.
In your post you said that your system is currently charged with R12 and you didn't want to replace it. There is no way to replace the compressor without first removing the R12. You might find a shop that can capture the R12 and then recycle it back to your car. Those shops are pretty rare though.
Question from Zack (1974):
In my '74 Imperial, I have an Auto Temp II temperature system, and everything works fine, except there is an annoying noise that sounds like it is coming from under the passenger side of the dash. It's a buzzing, and it happens only when the temperature dial is in the middle somewhere. Not when it's all the way hot or cold. My first guess is that maybe something is wrong with an outside air intake vent. Because when the dial is all the way hot, it would close outside vents and only allow the vents through the engine to blow air. My mechanic thought it was the servo that changes the air flow, because when you do put it all the way hot, it does buzz, but only for a few seconds. But it never goes away if you have a middle temperature set. If anyone has any ideas what it could be, and if there is an easy way to fix it.
Reply from Steve:
This first thing I would do is take off the dash-pad. It comes off quite easily....in minutes actually. With the dash-pad off, most of the system is right there at your fingertips.
That metal piece at the base of the inside of the windshield has to be popped up first. Possibly running the system with the pad off will help you track it down.
This page was last updated December 1, 2004. Send us your feedback, and come join the Imperial Mailing List - Online Car Club