
Imperial Home Page -> Imperials by Year
-> 1957 -> Kerry's
Restoration
-> part 4
2/30/97
I'm going to have to go back to work just to rest up. I'm whipped, or as we say in the South, Whupped!
This morning I torqued the heads with the bolt I got from the speed shop. Then I cleaned the lifters and pushrods being careful not to get them mixed up. If you get lifters out of order it will waste your cam in a heartbeat. I dropped them in my oil/STP goop and inserted them in the lifter bore. The pushrods were easy (once I realized they were NOT hollow like GM and Ford pushrods are...dang, it's sad to be old and getting blind). The only hard part was getting them to stay in place while I tightened the rocker arms.
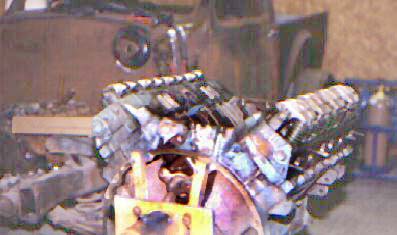
The engine is about done. The valve covers and intake manifold are about all that's left. I'm going to get a new fuel pump because the old one had a mud daubers nest in one of the pipes. It is probably cleanable but they are cheap.
Now for the fun part. I pushed the nearly complete engine into another room and covered it up. I also moved my tool chest and rolling tables into the same room. I did this because I want to steam clean the undercarriage of the Imperial today. The Imperial is already on the lift.
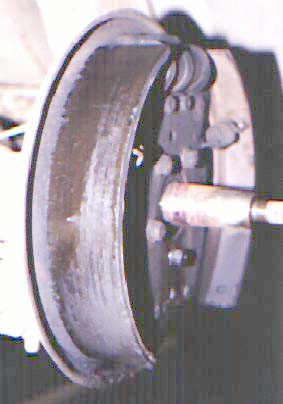
I decided to pull the wheels and tires so I could clean out the break shoes and save myself breathing all the brake dust. Fortunately, I remembered that the drivers side has backwards threads on the lug nuts. I can understand the physics of why Chrysler did this but is sure is a pain and I have NEVER seen a lug nut come lose on a GM or Ford!
The fronts were easy, pull the dust caps, cotter pin and unscrew the bearing nut. The wheels came right off. The breaks look pretty good. Better than 1/8 inch of lining left on the shoes and the wheel cylinders show no sign of leaking. I MAY stay with the brake linings since they will probably last many years of the amount of driving I will put the Imperial to. But if new linings are available and reasonable I'll go ahead and change them. I'm concerned about them having to be "ground to fit". I have no experience with this type of break. What advice does the group have?
The rear wheels were next. Oops, it is a good thing I still had my neighbors 3/4 drive socket set because I did not have a socket big enough to take the rear axle nut off. This is the second time I've needed the big socket set so I guess I buy one. I will probably buy a cheap import set. I do that with tools I use infrequently. They seem to hold up fine to occasional use. Speaking of tools, the same friend who loaned me the 3/4 drive socket set has had good luck with the Popular Mechanics tools he bought at WalMart. They look as good as my Craftsman, a much cheaper, and have the same warrantee. I don't know if their ratchets are as good as Craftsman or Husky but the sockets look fine. (By the way. Don't buy a cheap set of 1/2 or 3/8 sockets. They don't fit and break easily, especially the ratchets.)
Setting up the wheel puller I had borrowed from my brother-in-law, I tightened up the center with my impact wrench, hit it with a 2 lb sledge, and it popped right off. It looks like it is the axle seal that is leaking, not the wheel cylinder. This could be bad news. I expect it would be much easier to change the wheel cylinder than the axle seal. Time will tell.
Moving to the drivers side rear, I could not get the axle nut off. The impact wrench would not phase it. Broke out my breaker bar...no luck. Got my buddy's 3/4 drive ratchet and socket. Applied the Great Ceremonial Cheater Bar (piece of 4' pipe that will slip over my ratchet handle) Put my back into it, bent the Great Ceremonial Cheater Bar, and hurt my back. By the way, the wheel has to be on the ground to keep the axle from turning. After about an hour, I got out the torch and applied some heat. After that the nut just about fell off.
OK, making progress now, time to use the wheel puller. I repeated the process I used on the other side. And repeated the process...and repeated. Wouldn't budge. I'm a smart guy, lets use heat again. No luck, it just won't budge. I'm putting as much pressure as I think I can without stripping the wheel puller and hitting it as hard as I think I should. Finally, I use the 3/4 drive ratchet, put a pry bar between the arms of the wheel puller and PULL. No luck...more heat, a lot more...no luck.
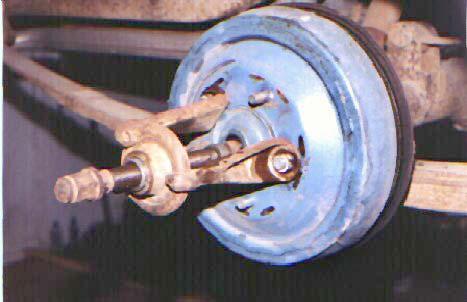
Time for a break and lunch. While I was inside I called my brother-in-law at Goodyear and asked him about the wheel. It was a discouraging call. He said that they had taken as long as two DAYS to get one of those "DARN CHRYSLER WHEELS" off. He suggested just keep heating, letting it cool, repeat, all while keeping pressure on it.
Well shoot! I guess I might as well lay out my plastic and try the steam cleaning. I had bought a 100' roll of 10' wide 4 mil clear plastic. I put one piece on the floor and slid 2x4s under the side to keep any water in the center. I then taped plastic to the side of the car and let it hang down to the floor plastic. Hopefully this would keep the water out of my workbenches and shelves. I have a floor drain but the concrete is too flat for it to drain well. I cut out the hole over the drain anyway. Maybe some water will go in it. Set up my fan to blow the steam out the garage door, unfortunately mother nature picked today for one of the 3-4 days per year that we have a wind out of the east, blowing right in where I wanted to blow out. Oh well, it's a BIG fan. Moved my steam cleaner right up to the front of the car, put on a new cheap rainsuit, and made sure to wear my 'bump cap'. A bump cap is a lightweight hard hat that keeps you from knocking your noggin. My lift will go 6'. I'm 6'3".
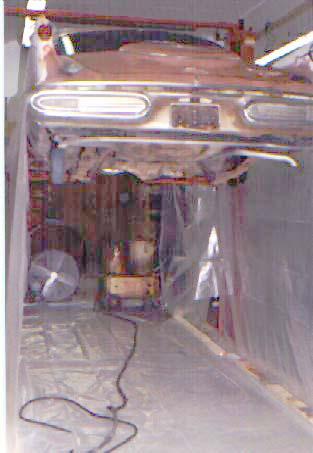
Three hours later the undercarriage is much cleaner and I am worn out. The steam cleaner did a great job on the 3 brakes that were open. The steam turned to water and ran off absolutely BLACK. It's snowing again and I had to do a little work outside with the steam cleaner but not too long because it's cold.
By the time I push all the water out and drag the plastic out, I'm just about done. Well, maybe I'll try the wheel puller again. Wishful thinking. I'll keep at it but any suggestions would be welcome.
By the way, did these things come with undercoating? That is what it looks like is between the frame rails but not outside them. Whatever it is it's TOUGH.
Tomorrow I'll work more on the wheel and start on the brakes.
I still haven't decided if I am going to use the transmission in the car or go get the cast iron 727 that already works with the push-button cable. I'll probably decide this weekend.
By the way, what color were the engines in 57? I know the 440 was not original but at least I can paint it the original color.
[From: Dan Dale
By the way, what color were the engines in 57? I know the 440 was not original but at least I can paint it the original color. While you're looking, what color is the engine compartment. I think it is black??? What about the underside of the hood...body color???
From: fwdlook@mindspring.com (Brett C. Snyder):
The '57 & '58 Engines I've seen have all been silver. (Black engines are from '59-61) Fan, generator, starter, distributor, oil breather cap and plug wire covers are all black. The inner fenders, firewall and under the hood are all body color. (There should be an insulator pad that fits under the hood, see web pages for Gary Goers products). Canister brake booster/black, Bellows brake booster/black rubber with silver metal, vacuum tank/gloss black. Air cleaner/black (59-61/gold). Radiator/gloss black. Also see Gary Goers for various engine compartment decals for that "finishing touch."
Also, see pages 57-59 of "Imperial 1955-1963 Photo Archive" from Iconografix. (See "Imperial Literature Resources" for book dealers).
This page was last updated October 19, 2003. Send us your feedback, and come join the Imperial Mailing List - Online Car Club
