
Imperial Home Page -> Imperials by Year
-> 1957 -> Kerry's
Restoration
-> part 7
1/4/98
Sunday afternoon. I still have some quarter round to install around my parquet but DANG IT, the stain is still damp...Darn! Guess I'll go out in the shop while my long suffering wife goes to the mall with her sister. Poor me, stuck in that greasy, smelly shop..
Did not have a lot of time because I had to watch ScanDisk fix some bad sectors on my hard drive. It may be going south on me. I'll back up tonight. (Famous last words)
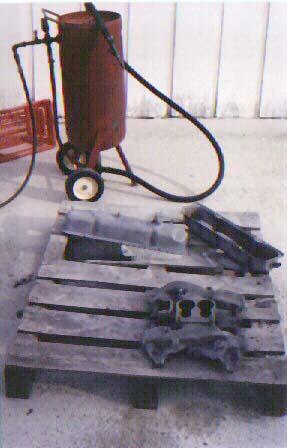
I decided to use the stock manifold for now as well as the valve covers. The valve covers are a mess with emissions stickers all over them and crud that just won't come off. Back in a corner room I use to store engines and such, I drag out my trusty sandblaster. Even 40 year old crud won't stand up to the sand. A word about sandblasting:
- ALWAYS WEAR PROTECTIVE CLOTHING INCLUDING EYE PROTECTION! I cannot stress this enough.
- Make SURE no sand remains that will get into your engine. I will pressure wash the inside of the valve covers and all the passages in the intake manifold. These were the things I sandblasted.
- Never touch sandblasted stuff with your bare hands. The slight amount of moisture on your fingers will cause it to rust. Believe it!
- I will be doing a lot of sandblasting later when I get to body work. Some people say it will warp the metal and I don't doubt it will but I've never warped any old stuff that has REAL metal in it. Today's tinfoil is another thing entirely.
After the sandblasting I quickly primed and painted with black engine paint. I think I have decided on black for now. I want to get Katherine driving so it will be easier to get into and out of my shop while I work on the rest of the mechanicals and body. It never fails that as soon as I get something immobile on my lift I need it for one of the families daily drivers.
While the paint was drying, I decided to look at the front wheel seals that I had pickup up last week. As soon as I opened the box I knew they were the wrong ones. Back to the parts place tomorrow.
Oh well, I really wanted to rebuild the rear wheel cylinders more anyway. Spreading a clean paper shop towel (I use the blue ones that come in a paper towel roll. They have them by the 6 pack at SAMS...I use a lot of them and have a paper towel dispenser in every room of my shop and one on the side of my tool chest.) over some fresh cardboard, I put the degreased wheel cylinder in a pan and honed it using a wheel cylinder hone in a drill. I've also seen people wrap 600 grit sandpaper around their finger but I prefer the hone. They're cheap. Make sure you use plenty of lubricant on the stones and clean it thoroughly after you finish. Any metal particles left will quickly eat your rubber cups and the cylinders will leak. I use disk brake cleaner spray. Works great to degrease and evaporated away leaving dry surfaces that can be wiped with a clean cloth until they are clean.
Time to assemble the new parts. Humm that cup went in easy, there is almost no resistance...it is the right size isn't it...Yep, 1 inch cup, says so right on the inside..sure is loose though. Maybe I better double check. Yeah it says 1 inch on the old cup...wait a minute, let me slip my glasses off. Oh shoot! It's 1 1/8! I'm not having a good year so far. One more thing to take back to the parts store. The good news is they gave me the 1 inch cups. They are only about a dime anyway.
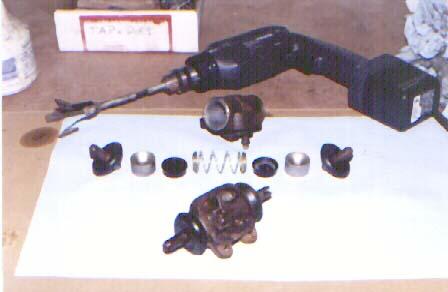
Normally I don't rebuild wheel cylinders because new ones are usually cheap but these are in excellent shape and besides my store did not have them in stock. I'll make sure I flush any old brake fluid out of the brake lines before I bleed the brakes.
The paint ran on one valve cover. This isn't my day. Maybe the Good Lord is trying to tell me something...think I get ready to go to choir practice. Next week should provide me with lots of things to do. The brakes shoes should be in as well as the seals. Katherine should be on her wheels shortly. I need to get a torque converter, some fluid, and I'll be ready to reinstall the engine.
Unfortunately I have to go back to work tomorrow. Time spent on Katherine will take a very noticeable downturn. I usually average 6-8 hours per week in the shop. Even less if I have been traveling a lot but when I'm in town I try to make up for it. After 27 years (on 1/9/98) my wife Carolyn has learned that I get crabby if I don't get my shop time on a regular basis.
Date: Tue, 6 Jan 1998
> And some questions about sandblasting;
> Do you use a cabinet or do you just blast outside?
> Do you have a pressure blaster or a siphon type?
> If you blast outside how do you control the mess??????
>
> I use a TIP pressure blaster outside does it ever make a mess!!
> I live in a suburban tract type of neighborhood so I cannot go farther
> from my house without getting closer to my neighbor. I tried fabricating
> a "spray booth" but during the summer just the hat & face shield
becames
> unbearable.
> Personally I use a 8" wire wheel on a buffer motor, it strips just as
> well and 1000% less clean up. You cant get the corners but then I use
> the sand blast cabinet for those. Actually I think the wire wheel is
> over all faster too.
> Any comments?
Jim,
I agree about the mess. I live on 3 acres so I don't have a neighbor problem and I can relate to the heat.
I have a 100 pound pressure type sandblaster, similar to a TIP but with a cheaper ball valve shutoff. I had to add an additional ball valve to the bottom where the sand comes out that just dumps straight down because the tank was always getting plugged. Now when that happens I just stop, crack the valve and the obstruction (usually a wet patch of sand) gets blown out the bottom.
I don't have a cabinet but do have a small "spot blaster" with some different nozzels which works nice for small stuff inside.
I have also used PVC to build a frame, drape plastic over it to keep down the dust but it's hard to do.
I have also tried to rig up a postive ventilation system using a small "muffin" type fan (like in computers) and some shop vac hose. I draw air across a styrofoam cooler full of ice and let the muffin fan push it up the shop vac hose . I tie it around my neck under the sandblast hood. Klugy but it beat passing out. It gets very hot in Alabama. The positive air flow also keeps down the dust that gets under your hood. I try to sit the cooler about 15 feet away out of the dust cloud and use a small air filter over the intake.
When I did my sons 64 Impala it was August and we stripped the whole body. Used about 600 lbs of sand. If I am going to do a lot, I'll put down plastic and try to capture and recycle the sand. I use fine sand and get it at The Home Depot. Else I just let the sand go away into the grass. My yard needs the sand anyway because it is mostly clay.
If I have a rusty spot, I like to sandblast as much as I can get to, weld in a patch panel and POR 15 the rusty area. This seems to work well. My oldest 'restoration' is going on 6 years with no sign of re-rusting where I did repairs....
I've never really used a wire wheel for rust removal. I'm interested in your experience. Will it remove rust? I know it will do paint.
Date: Tue, 6 Jan 1998
I noticed in the recent brand bashing several references to the rust-through problem on 57 Imperials. I'm wondering what exactly the problem was. We haven't gotten to the body work on "An Imperial Saga" yet, but in looking over the car, I find VERY LITTLE rot. MUCH less than many of my newer old cars. For instance the floors on both my 64 Impala and 67 Mustang were pretty bad shape but the Imperials floors are rock solid.
The ONLY rot on Katherine is on the back end of the rockers and the rear quarter panels. On the drivers side the rear quarter, both inside, and exterior panel, is pretty far gone. It was patched with Bondo and wire and will need a complete set of patch panels for the lower 6 inches. Interestingly, the passenger rear quarter is fine but the passenger rocker panel is very poor. Other than that there is only a single rusty body mount just behind the rear axle hump and a few spots on the trunk floor due to water leaking in the trunk because of rotten trunk rubber.
So, what were the problem areas?
From: Tony Lindsey, Imperial-Leader@imperialclub.com
I'm going to take a huge leap of faith (I was born in 1955, so I don't recall much from the era), and see if I can clear up this point - I'll get to it by going around the block a bit:
The 1957 Imperials were the first production-cars to EVER have curved side-glass. Looking at it from a stylist's viewpoint, the step was obvious, since they were adding oomph to every single part of the '57 Imperials. The 1957's Imperial was meant as a styling breakthrough:
- For the first time, an Imperial was low enough where stylists had to be concerned about the way the outer roof looked from a standing position, so they added Silvercrest and Landau treatments, and even mirrored the same effect on the headliners!
- Even the package-tray behind the rear seat was over-styled - It was a stair-step design for no reason except to add beauty.
- The 1957 Imperial windshield was the first one to not only curve from side-to-side, it also curved over the top a bit. (Maybe not the only one - Didn't the '57 Mercury have a compound-curved windshield?)
When the stylists came up with the curved side-windows, the engineers had to come up with a way to make them work, particularly on the brand-new Southampton four-door pillarless hardtops. They did a good job, but not a perfect job. I own no less than THREE separate booklets and factory bulletins that explain how to adjust the window-channels properly. They tended to sag inward at the top, allowing water from rain, snow and and carwashes to come in and settle along the doors and rocker-panels. I vaguely recall a factory bulletin that tells dealers how and where to drill drain-holes to prevent rust in early-production '57 Imperials.
My guess is that the four-door Southamptons were the biggest source of the "Rust-prone '57 Imperial" reputation. Compared to the other '57 cars on the market, they probably weren't that bad (considering the '57 Ford Fairlane four-door hardtop's tendency to have the rear doors fly open when going over big bumps, and the mid-50's Buick's awful brakes), but the factory-bodied '57 Imperials were a DISTINCT step down in build-quality compared to the legendary, practically hand-built Imperials that had come before. You fall a lot farther when you are on a pedestal.
Date: Tue, 6 Jan 1998
I got to look at my pushbuttons this afternoon and realized there was no park option! Did Neutral serve as park? Input please!
Also, I can't find any emergency brake levers, pedals, or other mechanisms on the 57. Can someone tell me if there was one and where the control mechanism was/is.
From: Ron Ribulotta
Date: Wed, 7 Jan 1998
Early models have NO park--- the lever or pedal is a drum type brake attached to the output shaft of the transmission, it is a Brake with shoes and a drum it is not a positive parking PAWL type as in later models. It works well , but needs inspection / adjustment OFTEN!
This page was last updated October 19, 2003. Send us your feedback, and come join the Imperial Mailing List - Online Car Club
