
Imperial Home Page -> Imperials by Year
-> 1957 -> Kerry's
Restoration
-> part 3
Monday 12/29/97
It did actually snow a couple of inches last night. Got everyone excited but the roads were clear so I did not have to take my long suffering wife to work. Was in the shop by 7 am!
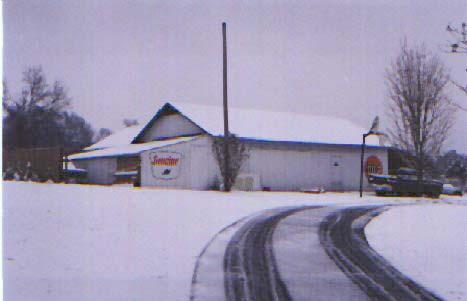
I decided to take some photos of the car at various stages.
Today I nearly finished the engine. This morning I cut the top off a milk carton and poured in half a quart of 10/40 and some STP. When I put the rings on the pistons I dropped them in the goop for a minute. I also wiped the cylinder walls down with the mixture. I bought a new tool last week and tried it out today. My old ring compressor is the band type that has an L shaped wrench that you tighten to compress the rings. Works but slow. I saw a "Low Friction Wrinkle Band Ring Compressor" (Lisle part number 21700) that is a lever action thing. Looks like it would be a time saver and was. If you are in the market for a ring compressor I would recommend it.

The only thing different I do in building an engine is I do them upside down, i.e. Crank on top. I find it is easier to guide the rods into location and I can push the piston up with a wooden hammer handle without being able to see it. I also make little sleeves out of masking tape to cover the connecting rods. If you don't cover them you risk dinging your crank. One pair will do all 8 cylinders. Installing pistons is messy work. I probably used a whole roll of paper shop towels. I lube the insert on the rod but not the crank or the top insert in the rod cap. I wanted to do the pastigage bit on the rods. All checked out at 15 thou. After the plastigage I cleaned the crank with lacquer thinner, lubed the bearings and torqued them down. I also make sure the crank will turn free after each pair of rods and pistons is in place. I did a 235 Chevy once that was VERY tight until I realized I had reversed a couple of the main caps which put a bind on the crank. DUMB! Building an engine is no place to hurry.
I am using a book I picked up at Barnes and Nobles called "Building Big Block MOPARS". It's quite good. Lots of photos and the sequence keeps you out of trouble.
Installed the timing cover and harmonic balancer after putting antisieze on the balancer. Then it was time for the oil pump pickup and pan. Oh Oh, the pan won't fit. Wrong pickup! DRAT!
45 minutes later I'm back from town with the right one. (I took the book because it had a picture of the pickup and their motor uses the same oil pan as I have).
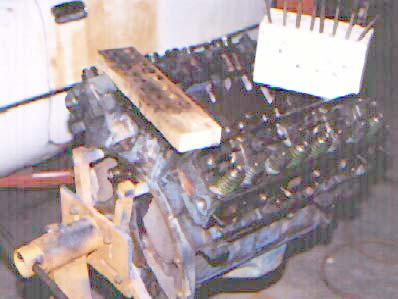
The 440 pan is much better built than small block chevys and fords. It's beginning to look like a motor. TIME FOR THE HEADS! Rotate the motor...dang this is getting heavy. My motor stand is a cheapie 3 wheeler rated at 750 pounds. The 440 complete is near that. If I were in the market for a engine stand, I'd suggest the heaver duty 4 wheel version. One thing about tools is that you get what you pay for. In the meantime I'll be watching my toes!
Now it's time to clean the head bolts. Hummm seem to be one short. Thirty minutes later I call the speed shop where I bought the oil pickup and see if they will give me an old head bolt. Joy, another 45 minute trip into Huntsville. While I'm there I ask the machinist how to tell the compression ratio. When I tell him it has flat top pistons which come to a little more than 1/4 inch from the top of the cylinder he says it is probably 8.8 to 1. I was hoping for a little hotter but in reality the pump gas being what it is 8.8 is probably fine.
Tomorrow I'll finish the heads and start steam cleaning the chassis. Yesterday I scraped some petrified dirt/oil and soaked it in EZoff. I also made my daily pilgrimage to The Home Depot to get some 4 mil plastic. I want to put some on the floor and drape it off the car to keep the mess down. I'm hopeful this proves to be a good technique.
Digging around in the trunk I found an envelope with a name of a previous owner. I am going to try and locate them later. The wife's name was Irene......could be a name for the car.
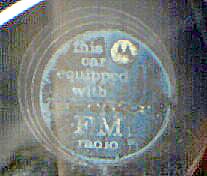
Also noticed something for the first time. Very faint faded decal on the passenger side of the rear window says "Equipped with Motorola FM Radio". It doesn't look like an FM radio because the numbers are AM but no doubting the decal. Does anyone know what the 57 FM radio looks like?
That's all on the car for today however, a couple of people have sent me some private Emails asking how I learned to do this stuff. It's kind of a long story. I've been car crazy for 40 years. Read all the hot rod magazines back in the late 50 till now (Some of the street rod mags have some GREAT how-to articles). I have no formal automotive training. I've built probably half a dozen motors, worked on my own cars, and completely restored 3 cars, doing everything but the machine work. For the most part I read everything I can about the subject at hand and am prepared to do it over until I'm satisfied. I do things over frequently but always save money over having someone do it. PLUS, I know what I have, know who to blame, and enjoy the activity. For me it's therapy. I work with computers and feed the need to get grease under my nails once in a while. It also helps to be patient and be warped enough to be able to guess how some diabolical Detroit engineer intended something to go together. Or even better...come apart.
Doing your own work is not rocket science. If you want to, you can. Mark Twain said "..the difference between work and play is that you don't HAVE to play... If you don't enjoy it, don't do it.
This page was last updated October 19, 2003. Send us your feedback, and come join the Imperial Mailing List - Online Car Club
