Hemi head woes in 2001
Very small, but very deep!
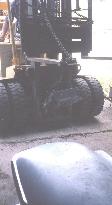
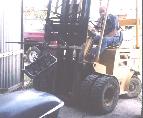
I suffered a huge breakdown in April of 2001. I ended up with a cracked head! It was the day after Fiesta ended, and himself was exhausted. he runs a bunch of vehicles in the many parades and some of the vehicles had been very reluctant to be included. I had taken part last year and had a great time. At midnight the previous day he had accidentally left his mobile phone at a down town gas station. He had gone there looking for some people supposedly stranded in "Alfie," the museum's 1958 fire truck - see 1958 Comparison vehicles. As he had pulled off of the freeway he noticed something was wrong but figured I was low on gas. After he filled me up, he got back on the freeway and went back to the museum and the problem seemed to be gone. On the drive down town, he noticed nothing unusual. But, as he left the gas station to get back on the freeway once more, I was pouring out steam. From his point of view it didn't look so bad. He had also put in some oil and a little had spilled so he didn't think too much about it. he was in a hurry to get home, pick up Treece and Jenny, and go to lunch. A fateful decision. If he had only stopped to look he would have seen that one of my radiator pipes to the engine had burst. All the water evapourated and then the oil started to boil. He pulled off the freeway just as my engine cut out and coasted through a credit union parking lot to some shade under a tree. I was pouring out smoke by this time, from the oil breather cap and the driver's side valve cover. Himself sat down under the tree, having opened my hood and surveyed the situation. He knew it was not good. It was such a beautiful day, too. Warm, without being hot, with a gentle breeze playing with the new leaves on the trees, and puffy white clouds drifting slowly across a lovely blue sky. He called for a tow truck and for Treece to come rescue him and me. Life for both of us was about to become very interesting.
For what it's worth, my recently fitted thermostat had seized up. It turned out there were some other interesting factors too. My radiator fan was on backwards . . . perhaps a contributing element to the demise of my fan clutch, which, fortunately, he has had a replacement for, for some time. Somehow, also, the wire to the temperature sending unit in my water inlet manifold has disappeared. Himself absolutely does not understand that, as he used to drive by the engine temp. gauge for a long time, because I also lacked a thermostat, for years. (How the gauge worked, without being connected is certainly a mystery.) Without a thermostat, I really kept my cool at low speed but would boil over rapidly at highway speed, because the water did not stay in the radiator long enough to be cooled down. With one, I ran much cooler but the actual thermostate did not last long and it's failure is what caused this mess to happen. Oh well! Just to cap the climax, my radiator was also 40% obstructed, a fact he discovered when he had the good sense to get it checked out. An "accident" waiting to happen.
Once the smoke had cleared - literally - it was time to face the music and dance to whatever tune was about to be played. His friends on IML - the Imperial Mailing List gave him encouragement and advice. First things first. Is the engine seized, or will it still turn over? He replaced the broken hose, refilled the radiator, turned the key, pushed the button, and, lo and behold, my engine was not seized. That was the good news. The oil was burnt and foul smelling and my engine got really hot, really fast. He turned it off, and pondered. He turned me back on, this time with the radiator cap off and noticed no water movement. My radiator stayed cold but the engine was hot, hot, hot. Had the water pump failed? He decided to remove the thermostat. Having refilled the radiator, he turned me on again and now there was water movement and the heat build up was no longer in evidence. What, however, was in evidence was spots of oil in the radiator water, increasing in number. And, steam was billowing out of my driver's side tail pipe. The other side was OK, but this one just poured out steam like it was going out of style. He turned me off again, and rechecked my oil dip stick. What had been black and burned before was now turning coffee coloured, milky coffee coloured. Not a good sign. At best, a cracked head gasket, maybe a cracked head, or something even worse.
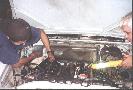
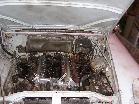
I was hoping it was just a head gasket. Himself certainly was. He was going to be the one doing all the hard work now. Money was an issue, plus there are not that many places that would even consider doing it. Plus, maybe he felt guilt at letting it happen. Or he just wanted to be the one to tinker with the engine and resolve the question. Beginning at the beginning, let's just say that a 392 Hemi is not a small engine. It has eight 4 inch diameter cylinders arranged four per side in a ninety degree V. For an engine compartment of such size, there is very little room to spare. Packed tightly around the engine are al the other vital components. Guess what? In order to do this job, the vast majority would have to be removed.
BIG HINT: Take lots of pictures in advance. You may think you know where everything goes but will you remember exactly each little piece of the puzzle's exact location later on? Himself did not do this, and regretted it badly. He did take notes, and many snaps as he went along, but he did not have a good reference for many deatils, such as how to wire back up the coil, the ballast resistor and the distributor. A couple of snaps would have a big difference.
Other good advice Keep track of the hardware. You may not notice that some bolts are longer than others as you remove them. If you can put the hardware into baggies and tape them to the relevant part, or number them and the part in a manner that you will understand later on.
First, the easy stuff. Disconnect the battery. Drain the radiator. Take off the big old air cleanerand its brackets, and the spark plug wire covers. Then the spark plug wires and the distributer cap. Then the brake booster and the hose from the water inlet manifold to the heater core. The hose from the radiator to the water inlet manifold. Take off the generator. Diconnect the three wires that are attached to it. It is held in place by a bracket on the inlet manifold. Release it there, and slacken off the belts. It has two. Remove the two bolts from the lower bracket. Lift out the generator. Its a wee bit heavy. Good practice!
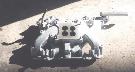
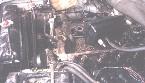
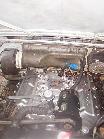
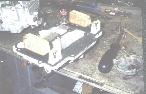
Now the real fun begins! You can get the driver's side valve cover off relatively easily. Be sure to remove the spark plugs first. They sit in protective sleeves about five inches long and the sleeves help to keep the covers on. To remove the one on the passenger side, you must first remove the round blower motor at the end of the heater core - see picture below. It is held on by three screws. To get it off, you will have to move a brace that runs from half way down the inside of the engine bay side wall to just about the blower motor. Himself did not take mine off completely. He just flipped it forwrd by loosening the side wall nut. The bracket holding the windshield washer bag is held on by the same nut, so take it off, too. The blower motor has a rubber connecter to the heater core, which has two large size adjustable straps. Loosen those first, then remove the three screws holding on the blower motor. They, and the motor come off surprisingly easily. Now you can take of the passenger side valve cover. It will still be a tight exit, as you will have to clear the rocker arms.
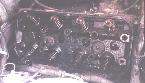
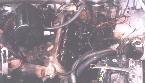
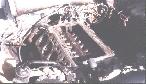
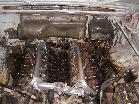
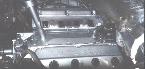
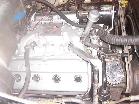
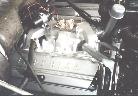
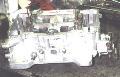
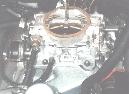
The tops of the heads are now exposed. Whoopee!! Take a break, you've earned it! The heads are held on by the bolts that also hold on the rocker arms. Apart from that there are two little pegs at either end on the head and that's it. Disconecct the carb. You do not need to remove it from the inlet manifold as it can all come off as a piece. There are many bolts of different lengths hold on the inlet manifold. Before you start removing them, number them in a manner that makes sense to you. You will save yourself a lot of trouble later on when it somes to reinstallation. Get a sticky piece of paper or some other tag and attach it to each bolt as you take it off and number the bolt. There are at least four different lengths involved. There are a variety of things held on by these bolts. The battery ground wire and two different A/C brackets, plus a number of hooks designed to keep various wires and hoses in place. Remember that hint about the photographs? With the bolts removed, get a friend and lift off the intake manifold. Take another break and try to keep good track of what you have done so far.
Remove the bolts that hold on the rocker arms. You will have to disconnect the brake line from the brake master cylinder in order to get all that side's bolts out. Be careful to catch the spilled brake fluid, and remember to use two wrenches when taking out the connector. The rocker arm bolts have two different lengths. The shorter ones go on the top row and the longer ones go on the bottom. Remove the rocker arms. Take out the rods. Again these are of two different lenghts. The shorter ones are on the top, the longer ones on the bottom, although the distinction between upper and lower is much less obvious. Before you remove the heads, you still have to remove the water inlet manifold. The A/C compressor will move out of the way on without taking any of the lines off, so you do do have to remove the freon unless you want to.
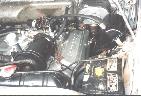
But . . . wait, you still are not ready to take out the heads! You still have to disconnect the exhaust manifolds from the exhaust pipes. It may be possible to do this from above, but it is far easier to do it from below, so get out your car jack and your safety stands. This is a difficult job, and you will need lights, patience and penetrating fluid. These bolts get super hot and they will be on very tightly. They will also be filthy, in all probability. On mine, himself sprayed them with "liquid wrench" over and over, for a couple of days, before attempting to get them off. Once started they came off easily enough, and it is worth the investment of time to avoid having to bore out the old bolts and resleeve them.
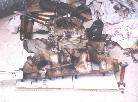
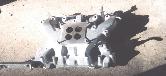
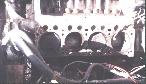
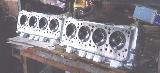
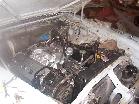
NOW you can remove the heads. If you have lifting equipment, use it. A hoist will do nicely, but you will probably have to remove the hood, if you haven't already. You certainly cannot do this by yourself. The heads are very heavy, at an awkward angle, still hooked to the exhaust manifolds, and the effects of leverage all combine to make it impossible to do alone, not to mention extremely dangerous. Mine were removed by hand, with himself and a friend, and it was very hard work. The heads have no natural gripping point. They must be angled upwards from the bottom so the exhaust manifolds will clear the block, then lifted out. Himself got right inside the engine compartment. On the driver's side the had to use wooden wedges to gradually increase the gap for the exhaust manifolds to get clearance. Not good for the gaskets, but they were toast, anyway.
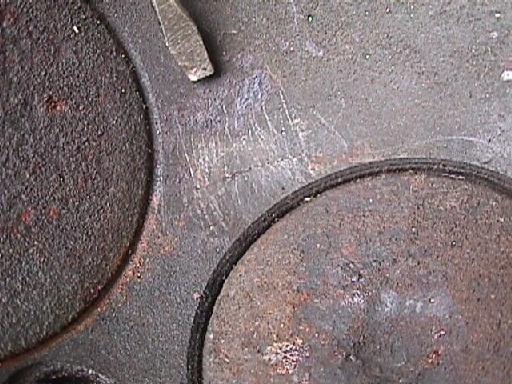
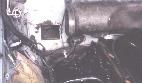
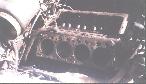
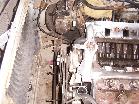
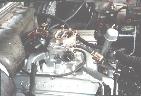
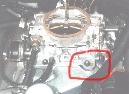
In my case, an examination of the gaskets showed them to be in pretty good shape. They were an old type, but not old enough to be original to the car. That, and some damage to the blower motor casing - see pictures - indicated that this was not the first time the heads had been removed. A close examination of the heads revealed the worst. There was a nasty crack between the inlet and exhaust valves on cylinder number seven, the one nearest the driver and the one furthest from the radiator - see picture at beginning of this page. Which makes sense. It is always the hottest cylinder, due to being so far from the radiator, and it would be the first to go dry when the radiator pipe burst and the coolan began evapourating out. I was lucky cylinder eight, nearest to the front passenger, did not crack.
Still and all, this was bummer news! A friend of himself's in the local Mopar club, Mark, confirmed the worst but had no suggestions as to a remedy. Maybe the head could be fixed. There is a process to achieve this, and Mark said he would try to find out who, locally, might be able to do it. Daunted and crushed, Himself asked his fellow Imperialists at the Online Imperial Club's ( http://www.imperialclub.com ) mailing list, for help and advice. They had been very supportive up until this point. He had asked them about the advisability of just fixing the side that was broken but, unanimously they said, "Nay, nay." No half measures. Didn't both sides get equally hot? Did we want an unbalanced engine once all the work was done? And, the clincher: Did we want to have to go through this again, soon?" Nay, nay, indeed!
Good call! Within hours, a list member suggested calling a wonderful company called Power Play Hemi - see links page. This is a small company dedicated to all the Mopar Hemi's, not just the 426's from the 60's. They had a refurbished, tested, used 392 head and would send it out for $100, including shipping. We got it in three days! Now that is damn good service! Unbeatable, in fact. Himself also ordered a Hemi rebuild kit, including parts for the lower reaches of the block, which would not be a part of this project, but may have to be tackled sooner or later. He also got a new set of apparently very nifty, performance, spark plug wires. The ones removed from my engine were just a tad crispy and fried!
Now, here is where the project, up to this point on time and way under projected budget, took a simple turn away from just being a fix the head project. There is a syndrome called "Might as well . . . since I've come this far . . . wouln't hurt to . . ." So, OK, that's an odd name for a syndrome, so let's abreviate it to M.A.W. Which stands for Might As Well. Rebuilding the heads was beyond himself's capability. He has neither the tools nor the experience to get it right. But a friend of the fore mentioned Mark, called Wade, was in that very buiness from his house as an extra job, and he said he would look at the heads and see what needed to be done. We were hoping simply to move the valves and springs from the old head to the new one, and reinstall them and be on our merry way. Wade took the valves out from both heads and declared them to be toast. They had been lapped once before and were too thin to save. Best to get new ones. Good old Power Play Hemi had them in stock. More expensive than the head itself, but by no means unreasonable. Delivery was a little slower, too, as they go racing at weekends, which is kind of cute, in it's own way. But, and this is the critical moment, old Wade "boiled" the heads. No extra charge, just part of the service, but they looked good when he did them. he recommended getting them painted, to avoid rust. And, there it was. The "P" word. PAINT ! It sounds so innocent, doesn't it?
Himself had attempted to clean up my engine once before, but that was literally all there was to it. He did get one valve cover painted, the easy to get at one on the driver's side. He reckoned getting the other side done was more trouble than it's worth, as it is all but covered up, anyway, by the big old air cleaner. Now, with encouragement from a museum colleague and friend, Michael, who was restoring a rail motor car on the other side of the building I was in, it was decided to clean and paint . . . everything! Could Wade oblige? He certainly could. Could he clean some of Michael's parts, too? Why, certainly! (Michael's ulterior motive starts to become abundantly, nakedly, indeed, apparenet at this juncture, doesn't it?) And was Wade nearby? Not exactly. On totally the other side of the city, but, hey that's what highways are for, right?
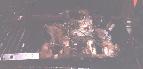
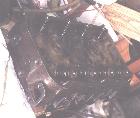
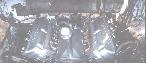
Off went the valve covers, and the manifolds, and the brackets, etc, etc. At this point, it was thought this would only delay my rebuild a week or two at the most, and not be too expensive. Himself was tripping on his success with the Head. My head has gone to his head, you might say. The inlet manifold was particularly filthy. All the original paint had burned off years ago, to be replaced by layers on grime - see pictures. Naturally, the carburetor was nasty, too. Its location was compounded by a persistant drip of gasoline when the car was being started and shut down. Not that much, and not for too long, but certainly enough to stain and discolour the unit quite badly, like a smoker's fingers. From this vantage point, it is no longer clear why he didn't ask Wade to clean and rebuild it. Maybe he did, but Wade declined. Himself did not feel competent - rightly so, dear chap that he is and all - to do it properly, so he took it to the best known, possibly only, Carburetor shop in town. The service was a little cool, but the price was right and time frame as quoted was fantastic, so no real problem on that horizon.
Aah, but the best laid schemes of mice and men . . . It was at this point, at the end of May, one month after my crack-up, that the project derailed. And badly, too.
Against the advice of some local friends, my carburetor was taken to a Carb. rebuild shop. It is the only one in town, but the owner / operator is known to be a difficult man to deal with. Himself was reluctant to do this work, and, at that time, he knew of no one available who could help him learn. The carb. was working fine apart from the above mentioned tiny leak from an overflow hole on start up and shut down. But it was filthy and could stand the attentions of a good rebuilder. The carb. shop guy was uncommunicative, to say the least. It took almost two weeks for him to release the information that the unit has a miniscule crack at the base, where the "tab" that holds the carb. on is located. A repair was impossible and a replacement unavailable. It should be noted at this point that this is actually true. It also turned out not to be the whole story. If only he had said, however, just go and reinstall this one, dab some epoxy in the tiny, almost invisible crack, and get on with life, THAT would have been the whole story. Instead my reconstruction project simply ground to a halt as himself scrambled desperately to find a solution.
Two "simple" solutions were most obvious. A, get another carb, or, B, get my original one fixed. Getting my carb fixed did indeed prove to be impossible. Its alloy is a combination of aluminium and zinc, pot metal in other words, and it is simply not possible to weld it. It is too soft, and would simply "melt," if high heat were to be applied. The location of the crack did not help, either, but was less signiicant. A lot of metallurgy terms started coming into play, such as lubricity. I was stuck on the horns of chemical, microscopic, considerations.
Replacing my carb. was a lesson in history. 1958 was the first year of Carter AFB carburetors. AFB stands for Aluminum Four Barrel. Prior to this, Carter made carbs out of steel. The benefits of aluminum were in weight, height and performanc, as the material could work in molds of greater complexity. The carb that is right for this engine on this car ceased to be produced along with the engine, which is to say 1958. There are replacement, after market, carbs but these are one size fits all replacements and will not be the same in appearance, performance and, most critical of all, size. They might be taller, and require an adaptor to continue the use of the big old, side mounted, air cleaner. Height is a critical issue because, despite the size of the car, there is next to no room to spare under the hood, so a taller carb and an adaptor might not fit. Getting exact measurements was a trial in and of itself.
Time was dragging. A friend of himself's now had the base of the carb., and tried very hard to get it fixed before he, too conceded it could not be done. It was at this time the suggestion came up to simply put the thing back on, rebuilt as best we could, apply some epoxy and just forget about it. The original shop owner still had the innards and top section of the carb. He stated that gluing the carb. was indeed the best option and he would have done that if he had been asked. However, he himself had never suggested such a course of action, and he seemed content to let Himself twist in the wind, which inded he had.
Folks on IML (Imperial Mailing List) concurred and wondered why this was not the approach that had been adopted in the first place. Go figure. The remainder of the carb. was collected from the Carb. shop owner and Himself prepared to take it down to his friend who said he could rebuild it for him. A rebuild kit was acquired with no difficulty. Delay followed delay, however.
. . . more to follow
Getting started means fighting with the valve covers

You have to remove the blower motor
Boiling your intake manifold. It's a good thing.
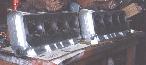
The rocker arm bolts also hold on the heads, shown here before removal
More or less finished taking things off, but not quite!

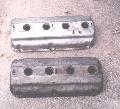
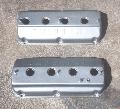
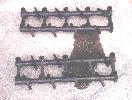
Some Hemi shots, cleaned, then painted
The Heads are just a wee bit heavy
Reconstruction in various stages
Almost finished

Spark plug wire covers on and then the carb itself
My C2650 in pieces and installed
Neither nice nor neat, but all put back together, anyway
Site Navigation & Links
•Site Entry•
•Dimensions, Statistics, Facts and Figures•
•The Imperial: A Brief History•
•My story, Part 1. From my first to my current owner•
•My story, Part 2. From 1994 to 1998•
•My story, Part 3. From 1998 to the present•
•Cracked head woes in 2001•
•Photo album•
•Tom McCahill's 'Mechanix Illustrated' 1958 Imperial Review;
•Other 1958 Imperials•
•Other 1958 Cars•
•1958 Imperial Advertising images•
•News & Trivia from 1958•
•Mecnaical Info: Parts, Suppliers•
•Imperial Links - Web Sites, Books, Videos, Etc•
•Family & Friends•
•Contacting Mrs. Blueberry•
Site Established: May, 22, 2001
copyright ©2001